
How to Relieve PMS
In this post you’ll learn how to relieve PMS using natural methods. I’ll be sharing techniques that I have found helpful for alleviating the typical, often unpleasant symptoms of PMS.
What is PMT or PMS
PMT and PMS refer to the same thing. PMT is an abbreviation of premenstrual tension, while PMS means premenstrual syndrome. I will be using the term PMS just because I use this term more often, although I often feel that the word ‘syndrome’ makes this completely natural process of female body sound like an ailment or a disease.
Yes, it can be unpleasant, but it’s not necessary to stigmatise the specific time of the natural monthly cycle. It’s not something we should be fighting against, try to stop it, but rather fully accept it, adjust to it, anticipate it, allow ourselves to ease up a bit during that time, and learn techniques for alleviating the emotional tension and physical discomfort.
Tips & Tools for PMS Relief
Mellow Mudra
The word Mudra comes from Sanskrit and means ‘seal’, ‘gesture’ or ‘mark’. Yoga mudras, practiced in Hinduism, Jainism, and Buddhism, are symbolic gestures of the hands and fingers. They facilitate the flow of subtle energies in the body.
The exercise ‘Mellow Mudra’ is a combination of the previous exercise (The Neurovascular Hold) and a mudra, which activates specific energy pathways connected to the emotions of ‘letting go’, and helping with the release of grief.
This posture will also help you become less reactive, which, needless to say, is much needed during the premenstrual tension.
Donna Eden is describing this exercise in the following video:
Triple Warmer Smoothie
This is a super-simple yet effective technique which help you relax, lower your anxiety, and help relieve tension from your body.
It is based on a backward-tracing a meridian that governs the fight or flight response. After doing this, you will feel Doing this will more centered, grounded, and relaxed.
The technique is presented by an expert in the field of energy medicine, Prune Harris.
Blow Out
This technique called ‘Blow Out’ will help you release the built-up chemicals of stress from your body. By doing this simple exercise you will be engaging three important energy systems which will assist you with getting rid of stress (and possibly even preventing illness, because a large number of illnesses are stress-related). You will find it in this video (which I’ve already inserted to show the Neurovascular Hold) from 3:20 onwards.
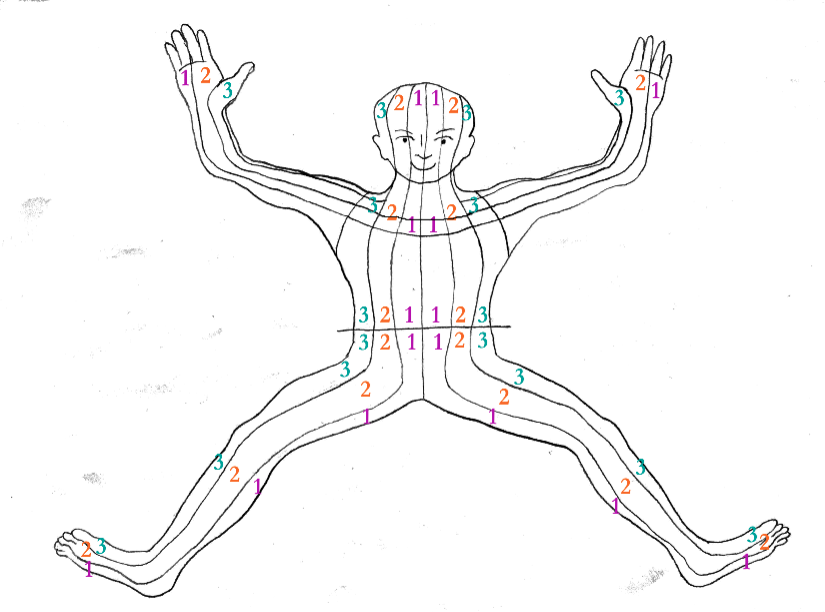
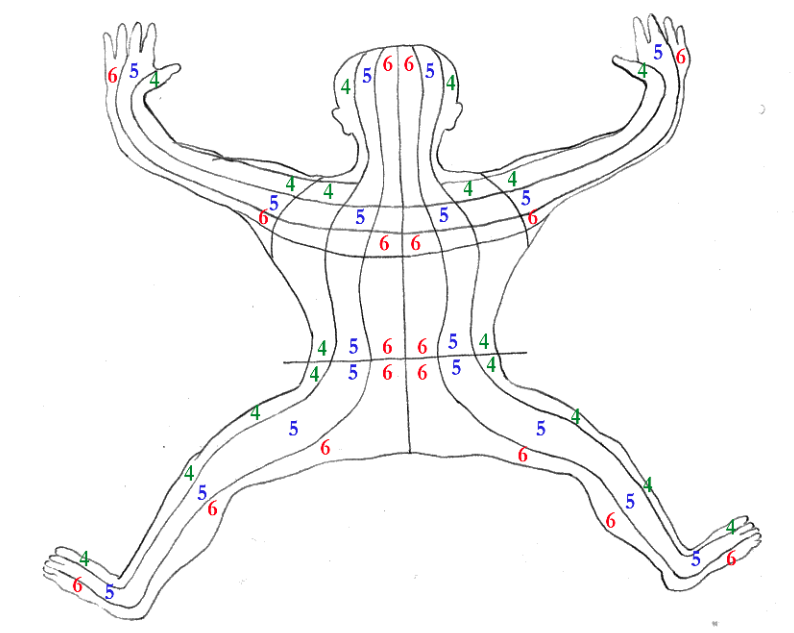
Balance Your Meridians (Energy Pathways)
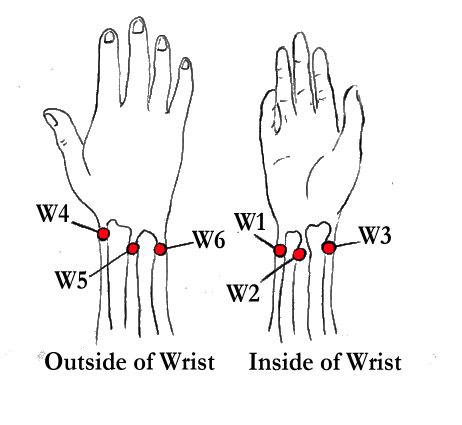
According to Traditional Chinese Medicine, hormonal imbalances during PMS can be improved by calming and refreshing specific energetic pathways in your body, also called meridians or channels.
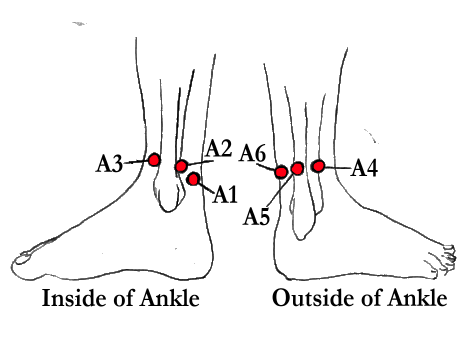
This can be done by tracing the meridians with your hands, or holding specific acupressure points.
Acupressure can clear the meridians of stale and toxic energies, ease the emotions as well as physical pain, and help the body return to a state of balance.
Donna Eden recommends focusing on a number of meridians during PMS.
For emotional problems such as stress, anxiety, sadness, and gloominess she recommends:
- Calming (sedating) the Triple Warmer meridian
- Strengthening the Spleen meridian
For the physical symptoms of PMS, she recommends focusing on the following meridians:
- Kidney (for back pain)
- Liver (for groin pain)
- Stomach (for breast tenderness and cramps)
- Small Intestine (for pain in the upper back combines with cramps)
- Large Intestine (for pain in the lower back)
- Circulation Sex (if your period is late)
Here is an example of how to work with your meridians:
If you experience tension or pain in your back during PMS or your period, a great way of relieving the pain is to sedate your Kidney meridian.
You may wonder how could a back pain be connected to the kidneys; This is because the kidneys have to filter more blood and hormones than usual and become full, overcharged and stressed, which leads to pain in the surrounding area.
So, sedating the Kidney meridian relaxes the kidneys by removing excess, tense energy, and provides relief to the nearby area – i.e. your back.
You sedate the Kidney meridian very easily by holding specific acupressure points. I have described the procedure (and other useful techniques) in my post called The Kidney Meridian.
I shall gradually add posts devoted to all the other meridians, including their sedating and strengthening points, so watch this space! ;).
Vitamin and Mineral-rich Foods and Supplements
Studies have shown that certain vitamins and minerals can assist with easing PMS symptoms from mood swings, anxiety, or insomnia, to breast tenderness and water retention.
These are:
- Vitamin B-6 – found in chickpeas, oats, bananas, tuna, salmon, poultry
- Magnesium – found in nuts and seeds, avocado, bananas, green leafy vegetables, legumes and seafood
Limit Your Caffeine and Alcohol Intake
It is a good idea to watch out for caffeine and alcohol during that week when you are more sensitive. If coffee usually lifts you up and gets you going, it could make you edgy and anxious instead. If an alcoholic drink usually cheers up up or relaxes you in your non-premenstrual days, it can have the very opposite during the sensitive week, making you easily angry or depressed! I am talking about my own experience.
Your Body Wants to Relax
If you notice that you’re within the week prior to your period then it’s time to honour it. Allow yourself an indulgent hot bath with relaxing essential oils and candles. Curl on the sofa with a cup of soothing herbal tea and a good book or a nice movie. All these little treats are well deserved and necessary.
By easing off for these few days, you will become more aligned with the natural rhytms of your body, and you’ll enjoy regaining your full strength and activity twice as much when this passes.
Allow Yourself to Go Within
Also, if it’s possible, try not to schedule any full-on social events, parties, family visits, etc during this period, because you may not enjoy it as much as you would at other times. Your body is inviting you to go within, get more introspective and quieter – basically, spend more time with yourself than with others. If others see you as ‘grumpy’, let them do so. It’s important to get synchronized with your body and recharge your batteries, so you can spring back to your active, cheerful, and extrovert self again soon.
Last But Not Least…
Anticipate PMS – Ideally With Your Partner!
What I highly recommend (because it’s worked wonders in my case) is to set a notification in your calendar about a week prior to your anticipated period. This little trick has saved me a lot of unpleasant surprises and disconcerted guilty feelings about my sudden mood drops, and low states.

It is comforting to get assured that the bad mood it’s not ‘you’, but your fluctuating hormonal levels, and if you learn to listen to your body, it will start ‘collaborating’ with you. For example, as soon as I feel that something is ‘not right’ in my world, that I feel on edge, irritable, or vulnerable, I look at my calendar and often get the reassurance I needed!
If you feel like, tell the people around you (the ones that may get most affected) that you happen to be in that sensitive week. Tell your partner about it.
The more open you are about this topic, the more you’ll be helping to destigmatize the ‘dreaded PMS’, especially if you treat the whole thing with humour.
Next time your loved ones see you burst into tears for seemingly no reason, they won’t think that they have done something wrong, but will know that a chemical storm inside you is to blame instead.
Your Own Experience
I hope you’ve found this post helpful. If you have any tips or ideas to share, do leave a comment below – I’d love to hear about your (or your partner’s, or friend’s) way of dealing with PMS.
BY LUCIE DUN
This site has been built with DIVI, by Elegant Themes.

RECOMMENDED SECTIONS:


Disclaimer: This page contains affiliate links. This means that if you decide to make a purchase through my links, I will earn a small commission at no extra cost to you. (The full Affiliate Disclosure can be read here.) If you’d like to learn more about affiliate marketing, e.g. how to earn extra income from blogging and promoting products you like and would recommend to others, which is what I do, check out Wealthy Affiliate, my favourite platform for online marketers. You can create a free account, which will enable you to make your own website in a few simple steps, and host it with them – free of charge – for as long as you like. You can test it right now by trying their free website builder SiteRubix. Thank you for visiting!

Let’s keep in touch:

in alliance with