Acupressure Strengthening and Sedating Points

Acupressure Strengthening and Sedating Points

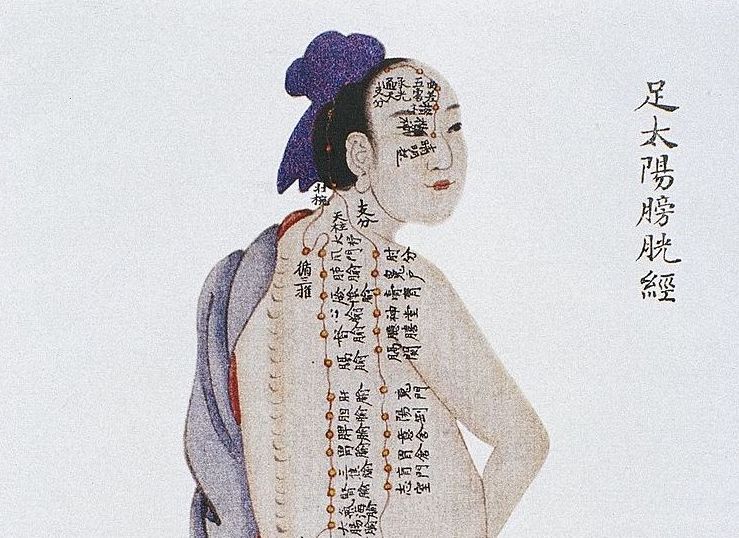
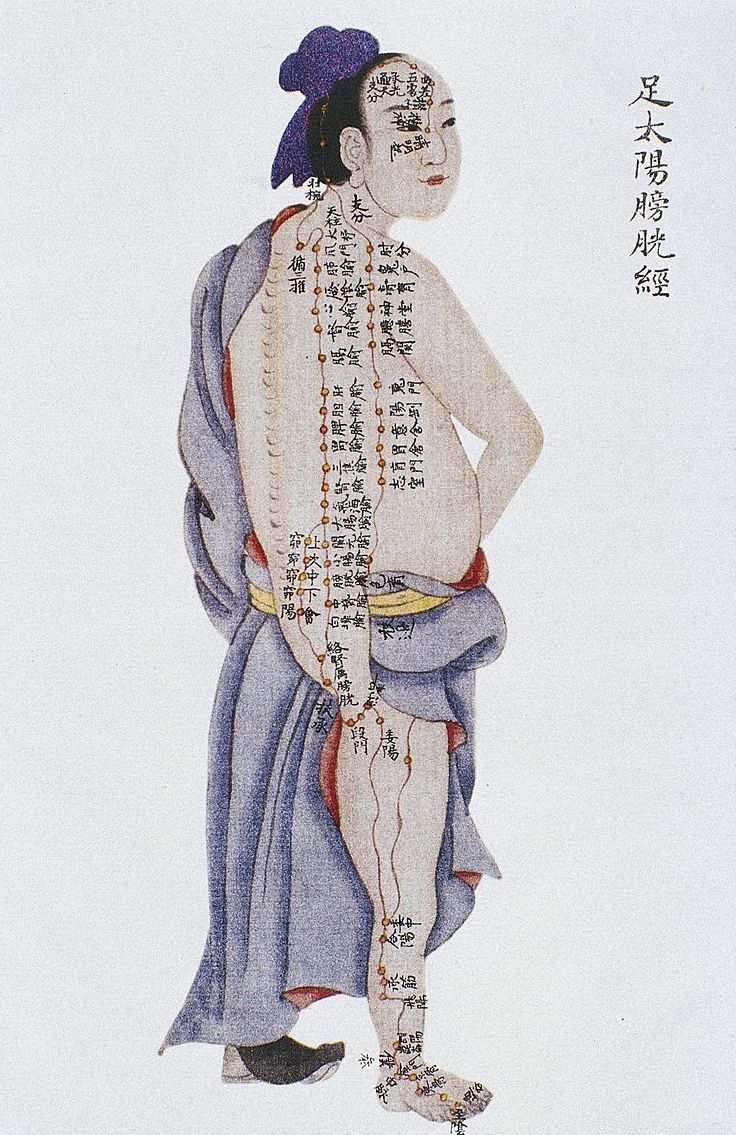
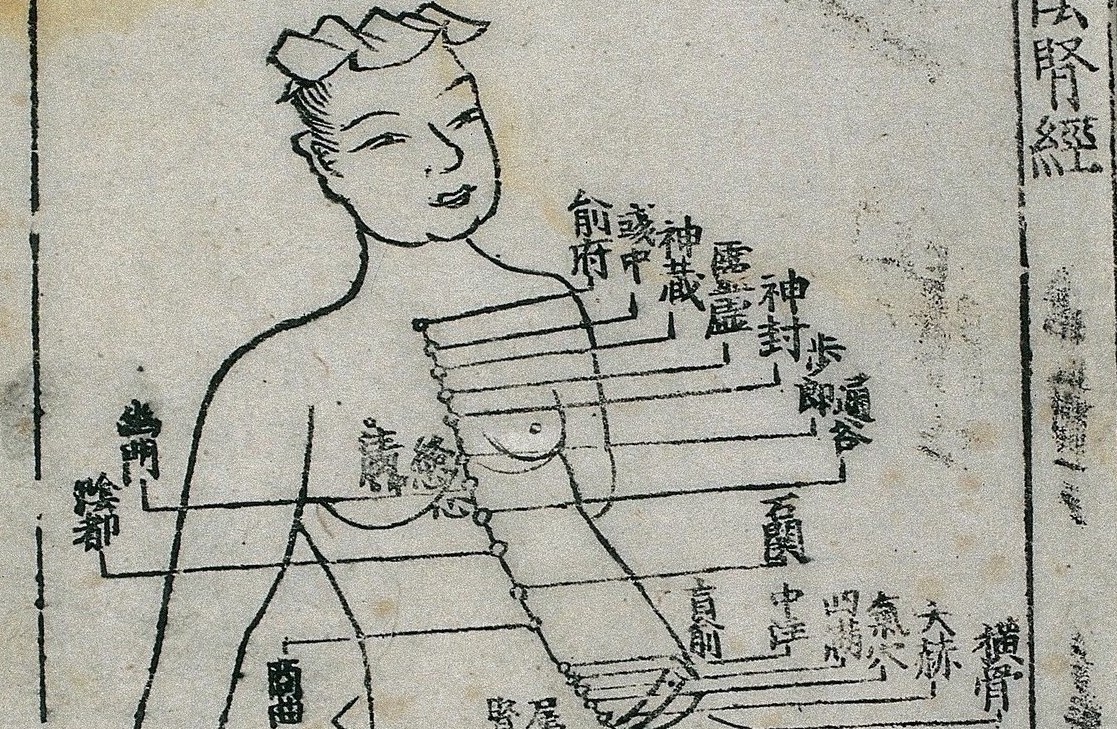
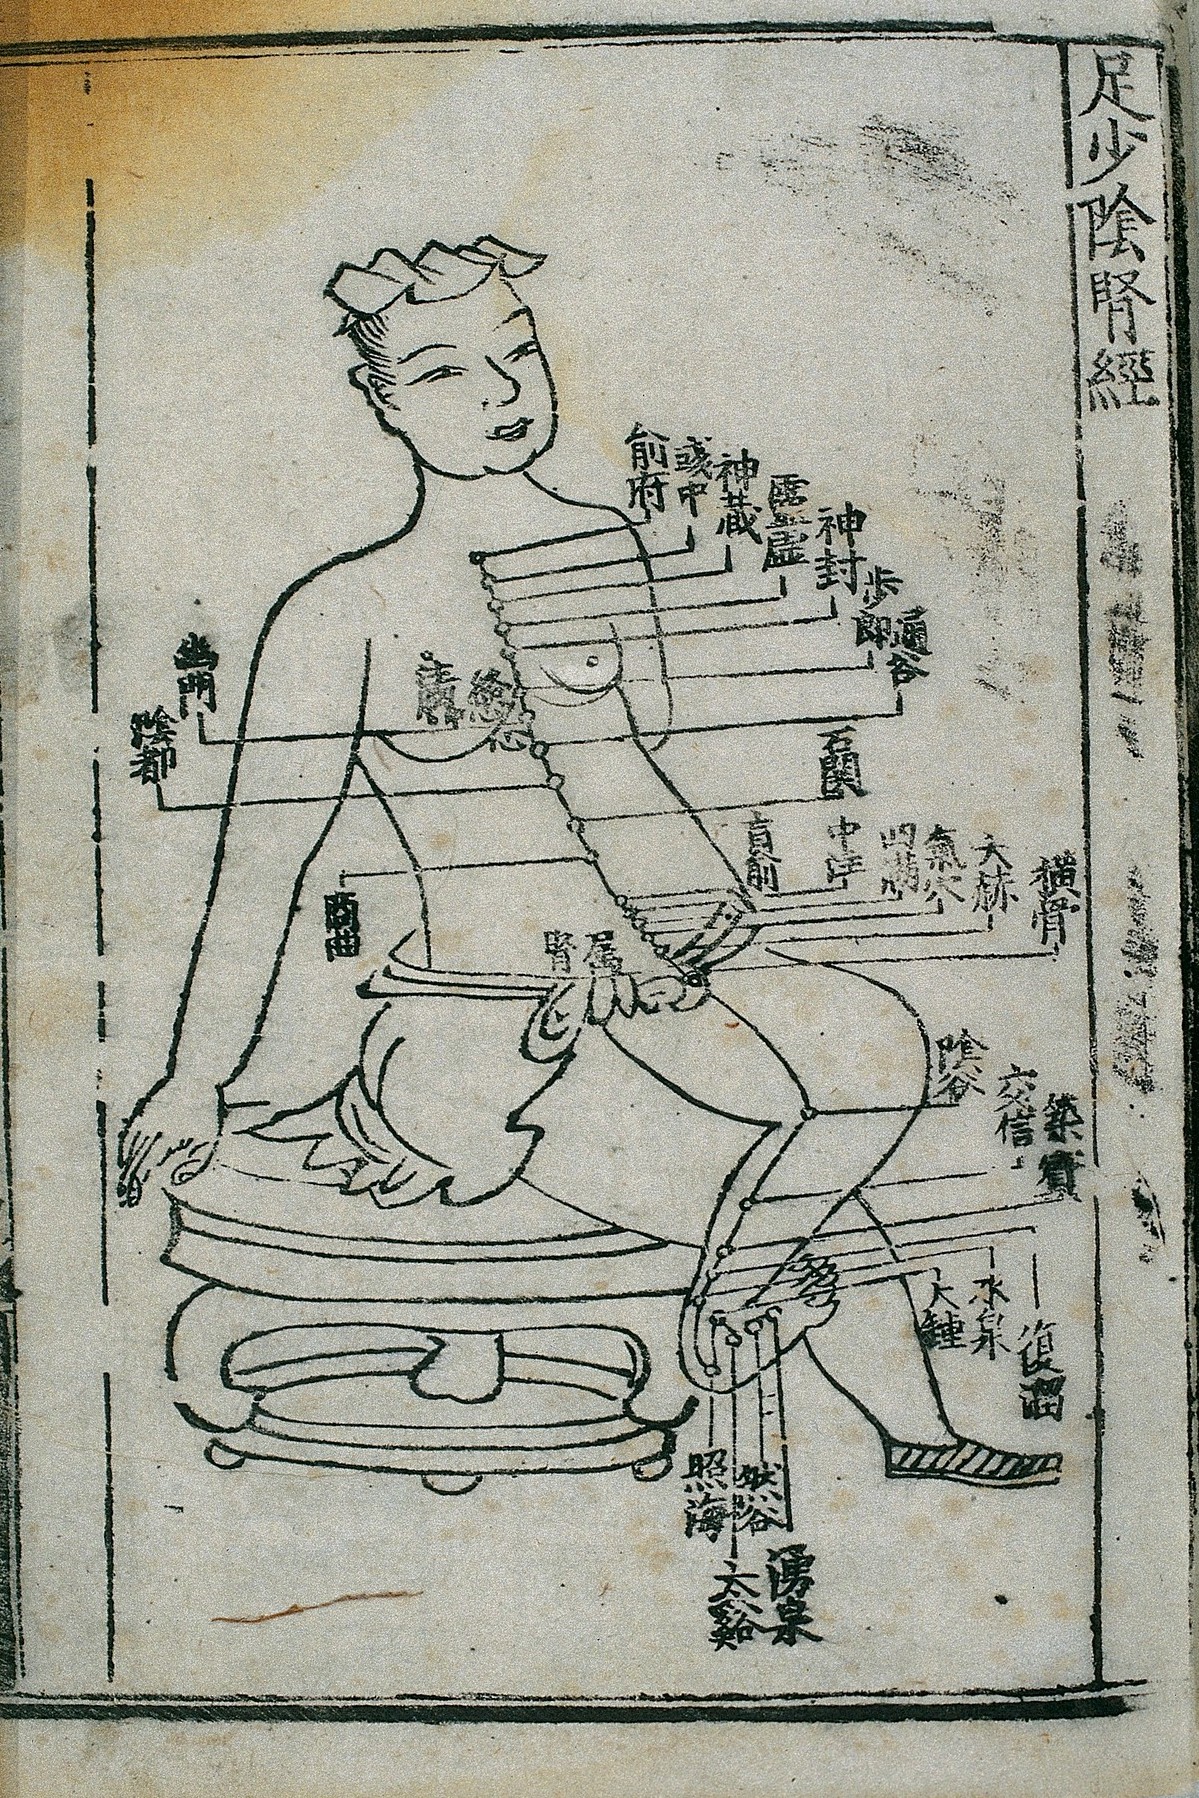
3-Bladder_channel_Wellcome-collection

One of the most exciting things about holistic healing is the fact that we can use our hands to facilitate healing processes in our bodies. This is often done by working with meridians (energetic pathways throughout our body) and their acupoints.

On this page, you will find a list of acupressure sedating and strengthening points that you can use for addressing specific issues, such as diminishing pain, strengthening your immunity, boosting your energy, balancing your hormones etc. These techniques are based on the systems of Traditional Chinese Medicine.

Feel Better by Balancing Your Meridians

Working with your meridians can often make you feel better in minutes. Strengthening the Spleen meridian, for example, can lift you from feeling down, boost your immunity, or even stop an approaching cold from taking hold of you. Sedating the Kidney meridian can diminish lower back pain.

I work with my meridians frequently, and it’s always very encouraging to feel the energetic shifts in my body, experience pain relief, and notice an improvement in my overall state. Equally, it’s been very rewarding to be able to help others diminish their pain or improve their state in general.

Techniques for Balancing a Meridian

To balance a meridian, you can use the following techniques: 

  • Trace a meridian
  • Flush a meridian
  • Work with the acupressure points of a meridian

Tracing a Meridian

Watch the master practitioner of energy medicine Donna Eden trace all the 14 meridians.

Flushing a Meridian

How to flush a meridian:

  • Trace it backward once
  • Trace it forward three times

(If you don’t know how to trace a meridian, watch the video above.)

Working With the Acupressure Points of a Meridian

There are three ways we can work with the acupressure points:

  • Sedate
  • Strengthen
  • Use the Three-Point Technique

Further down the page are diagrams that will show you how to sedate or strengthen any meridian, according to your needs.

How Do I Know What Acupoints to Use for a Particular Issue?

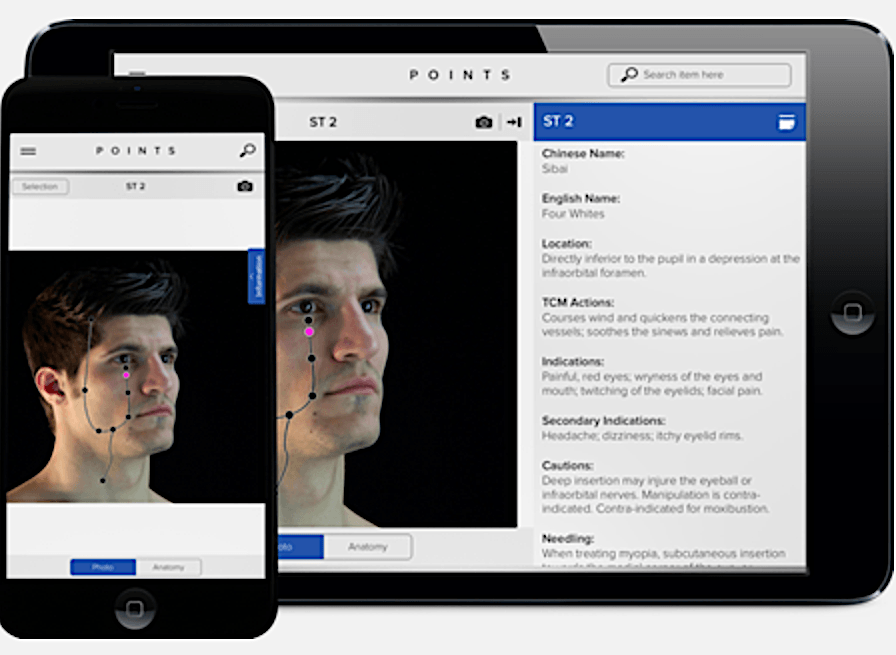
I highly recommend an app called POINTS which list a long number of conditions and the treatment protocols – e.g. of you have a headache, you will get a combination of acupoints that you can hold or massage to alleviate your pain. (You can read my review of the POINTS app here)

Sedating a Meridian

Step 1 – Sedate the Meridian 

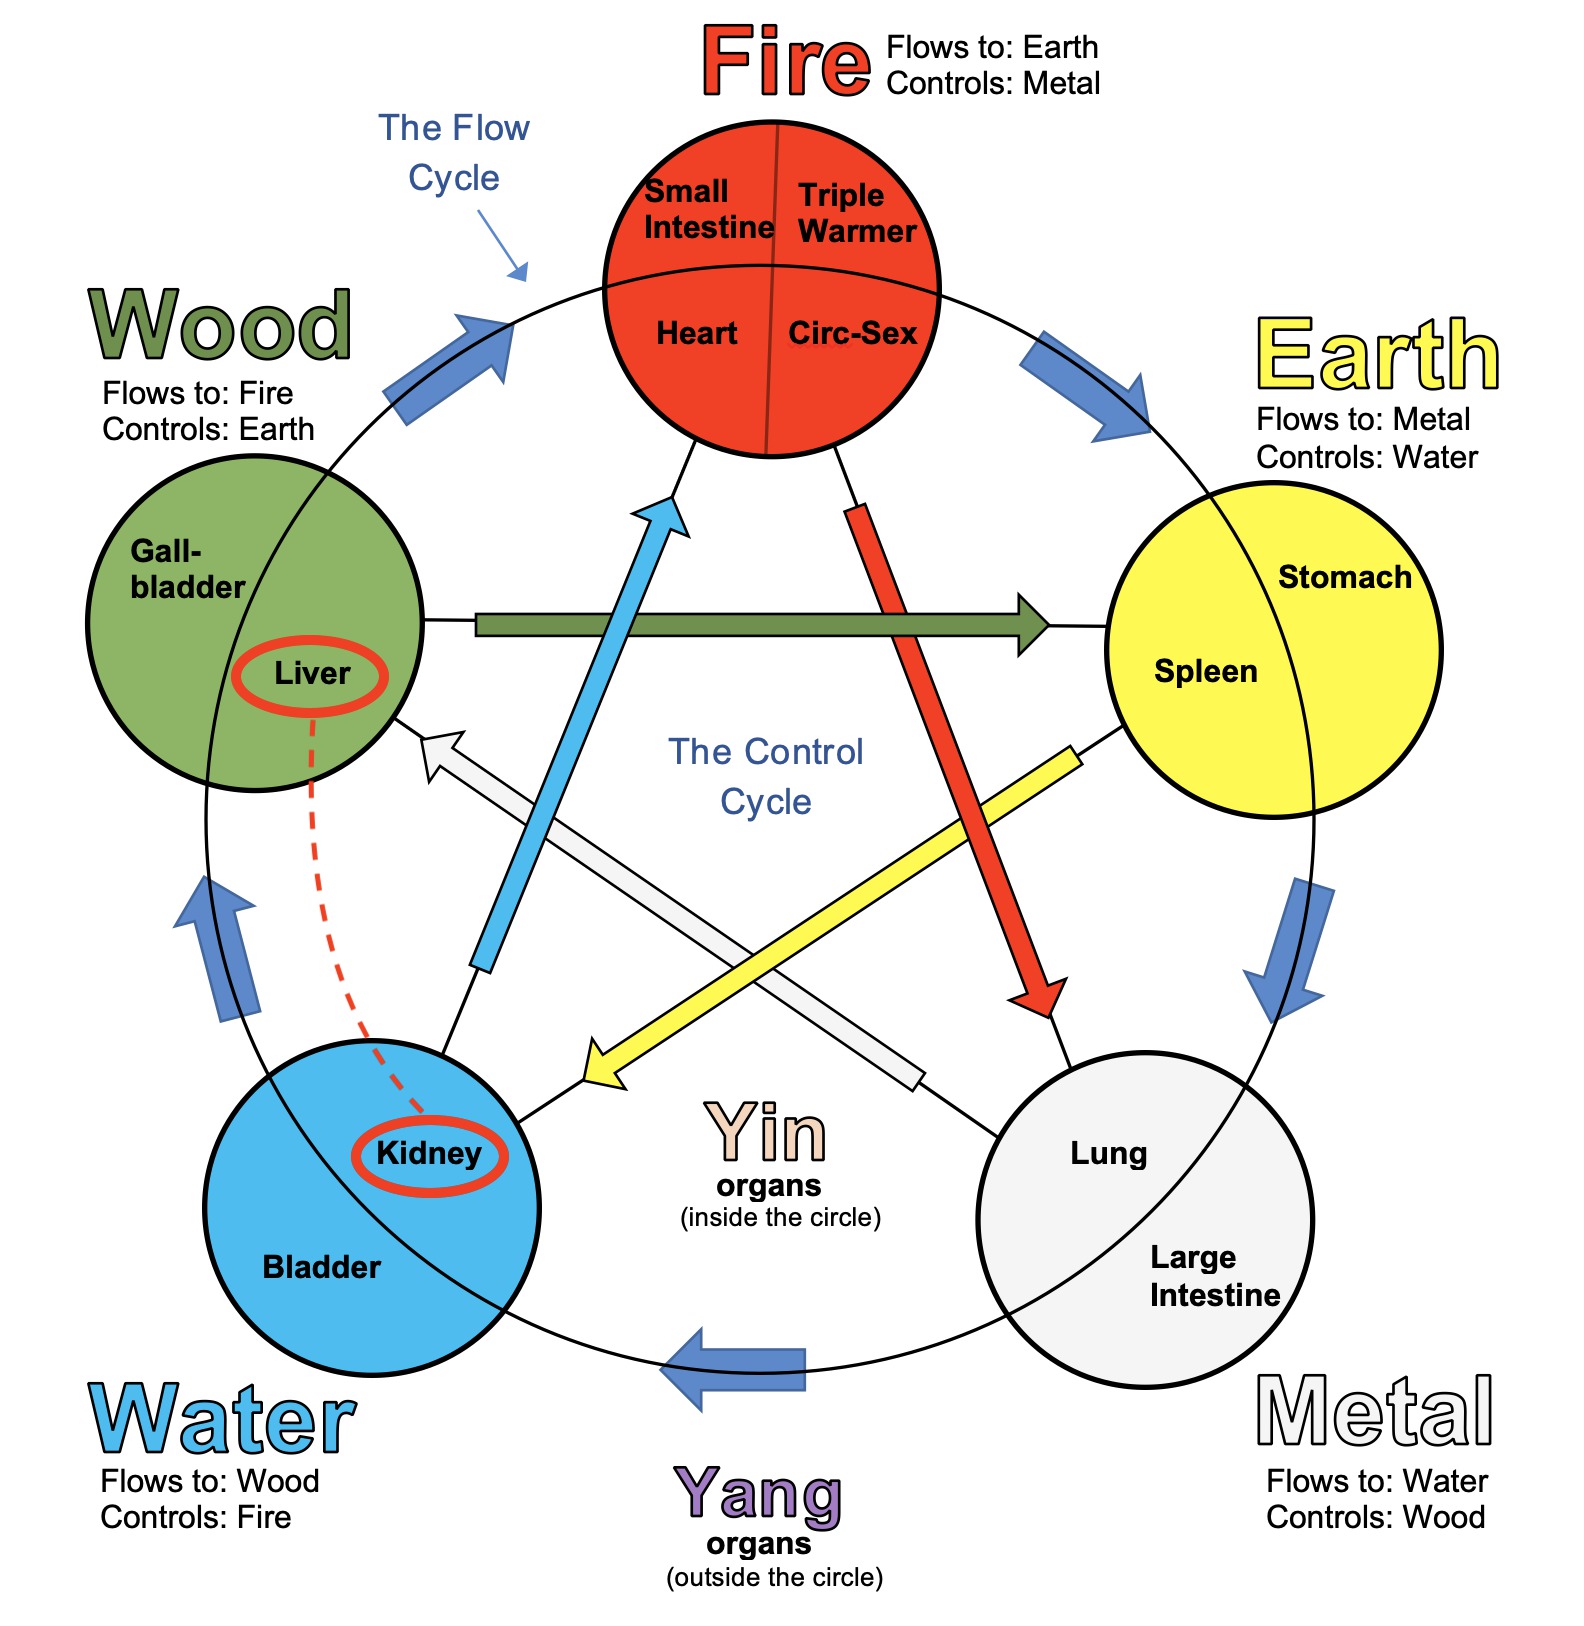
Sedate (relax) a particular meridian by holding its sedating points. You will be sending its excess energy to the next meridian. (You’ll see how the meridian flow works on The Five Elements Wheel diagram further down.)

The Procedure:

Gently hold the sedating points for 2 – 3 minutes. Use the tips of your fingers (preferably the index or the middle finger).

Do this one side of the body first, (e.g. on your right foot + right arm).

Repeat the same procedure on the other side of the body (your left foot + left arm), also for 2 – 3 minutes.

Step 2 – Stabilise the Energy Flow by Holding the Control (Stabilizing) Points:

We now need to stop the flow of energy from the previous meridian. We’ll be stabilizing the shift in energy by holding the control points.

The Procedure:

Gently hold the two control points for 1,5 minutes.

Do this on both sides of the body.

Strengthening a Meridian

Step 1 – Strengthen the Meridian 

Strengthen the meridian by holding its strengthening points. You will be ‘borrowing energy’ from the previous meridian (see the Flow Wheel lower down)

The Procedure:

Gently hold the strenggetning points for 2 – 3 minutes. Use the tips of your fingers (ideally the index or the middle finger).

Do this one side of the body first, (e.g. your right side) and then repeat the same procedure on the other side of the body, also for 2 – 3 minutes.

Step 2 – Stabilise the Energy Flow by Holding the Control Points:

Gently hold the control points for about 1,5 minutes.

As in the previous step, do this on both sides of the body.

Three-Pointing a Meridian

The Three Point Technique is a combination of sedating and strengthening a meridian in one session. Sometimes a meridian needs to be cleared of stale or toxic energies first in order to receive strengthening energies. This means that we sedate it first to move the old energies out, and then strengthen it. In the end, we use the control points to stabilise the shift.

We often use the Three-Point technique to treat hormonal imbalances, such as during PMS or menopause. (In these cases it’s Kidney, Liver, and Spleen).

Step 1 – Sedate the Meridian:

Sedate (relax) the meridian by sending its excess energy to the next meridian.

The Procedure:

Gently hold the sedating points for 2 minutes. Use the tips of your fingers (preferably the index or the middle finger).

Do this one side of the body first, (e.g. on your right foot + right arm).

Repeat the same procedure on the other side of the body (your left foot + left arm), also for 2 minutes.

Step 2 – Strengthen the Meridian 

After sedating it, you will strengthen the meridian by holding its strengthening points.

The Procedure:

Gently hold the strengthening points for 2 minutes. Use the tips of your fingers (ideally the index or the middle finger).

Do this one side of the body first, (e.g. your right side) and then repeat the same procedure on the other side of the body, also for 2 minutes.

Step 3 – Stabilise the energy flow by holding the control (stabilising) points:

Gently hold the control points for about 1 minute. As in the previous step, do this on both sides of the body.

The Five Elements Wheel

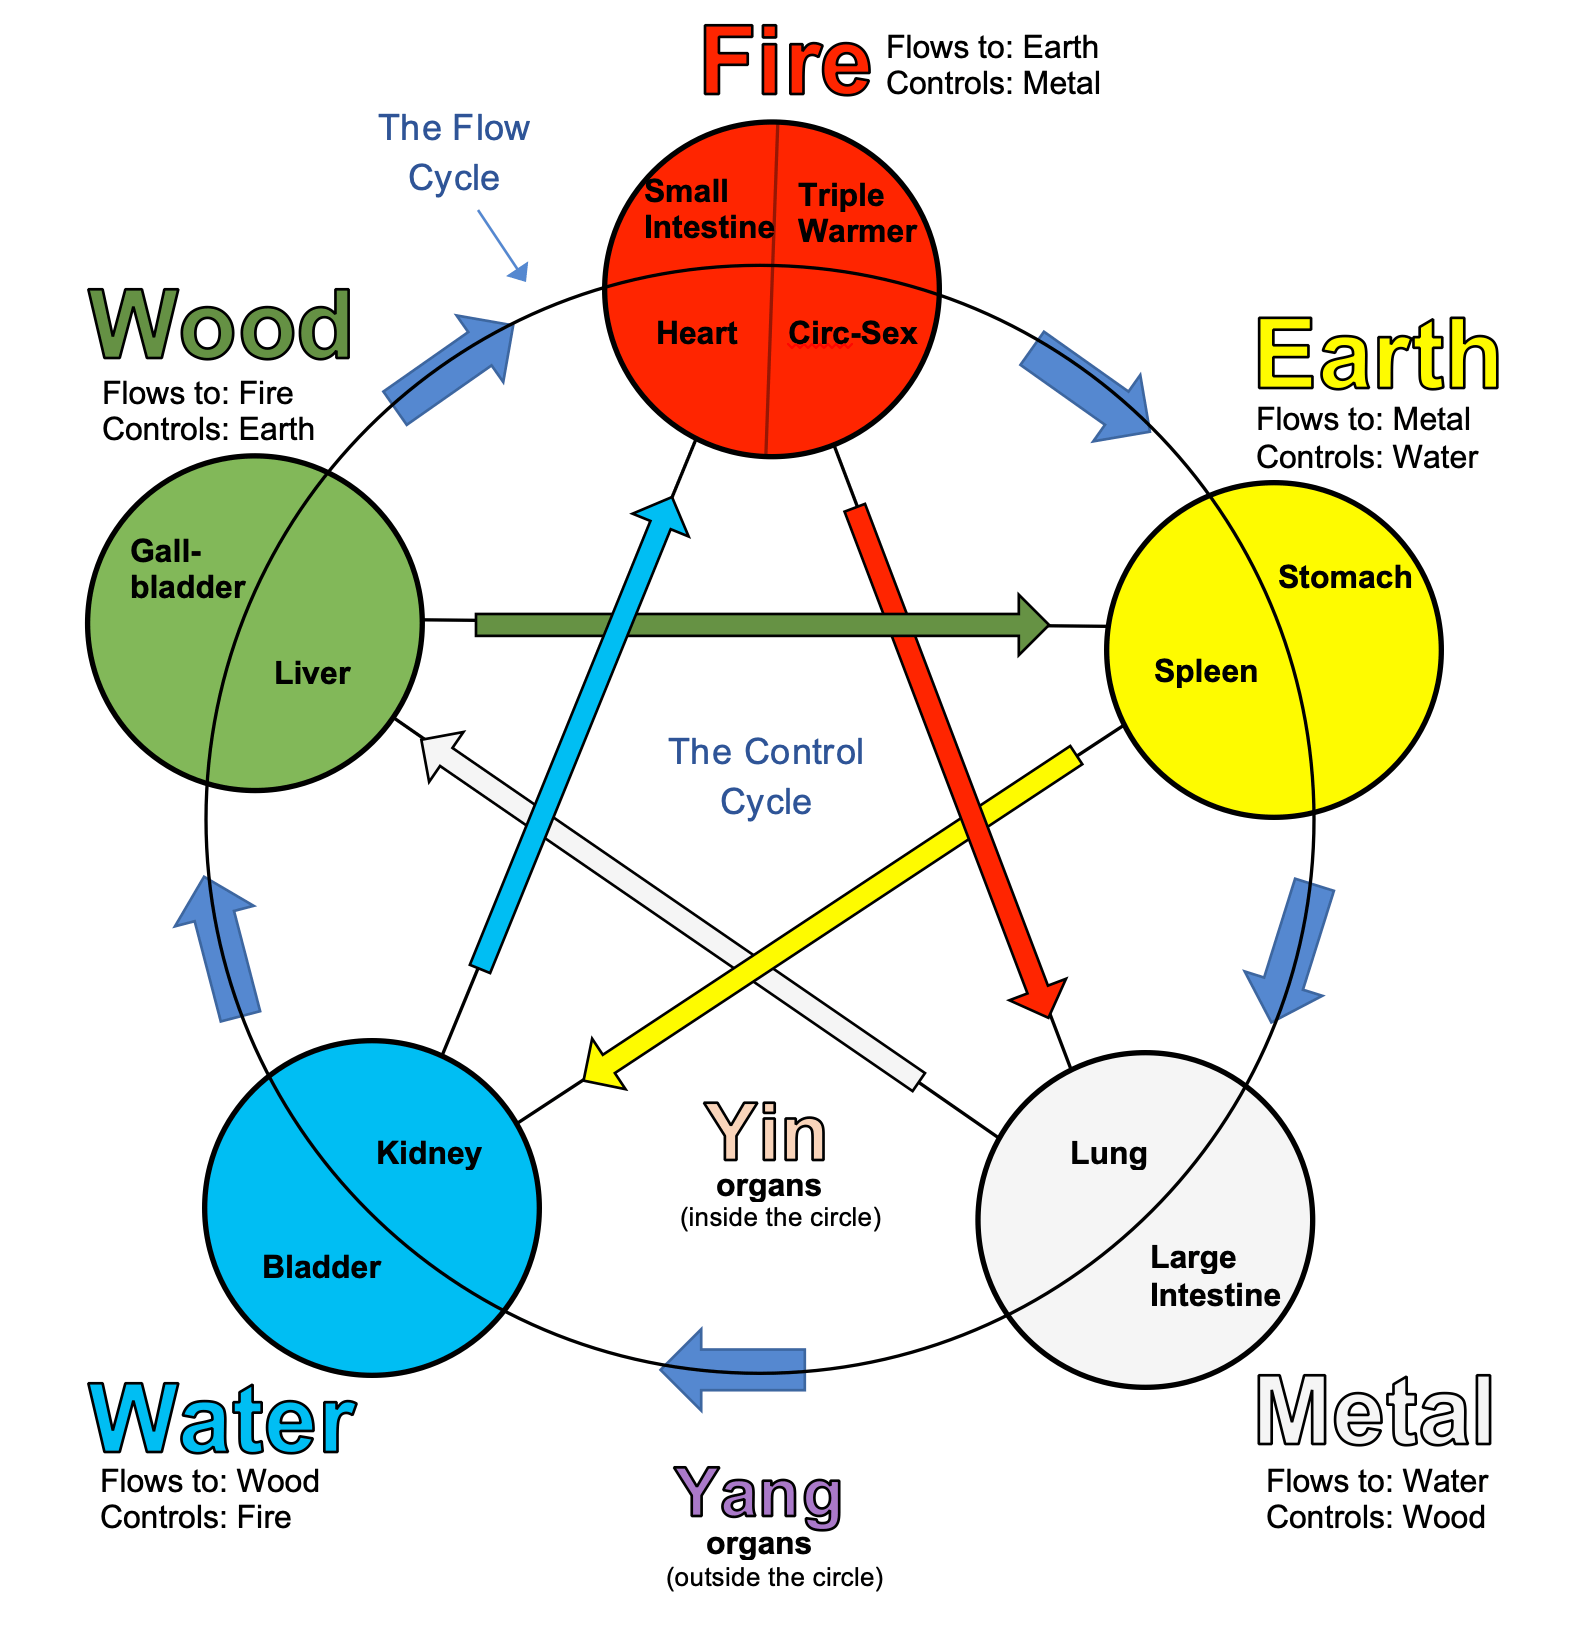
The Five Elements Wheel, used in Traditional Chinese medicine, shows how meridians relate to each other and what elements of nature they represent. It is an excellent reference for working with meridians and their acupoints. For example, when you are holding strengthening points of a meridian, you are sending energy to the meridian from the previous meridian.

When you are holding the sedating points, you are sending energy from the particular meridian to the next meridian on the wheel.

Finally, when you are holding the control points (stabilising points), the flow of energy of particular meridian will be stabilised by another meridian.

The Five Elements Wheel

An Example of Working with Acupoints of a Meridian

Let’s see an illustrated example of working with a meridian. Let’s say we want to strengthen the Spleen meridian to boost your immunity or to lift you from feeling low. I have selected this particular meridian because this is one of the most important acupressure practices that you can use for self-healing. It is one of my favorite methods for improving my immunity and lifting my spirits.

Strengthening Spleen Meridian

Step 1 – Strengthen the Spleen Meridian 

Strengthen the Spleen meridian by borrowing some energy from the previous meridian (i.e. Heart meridian).

The Procedure:

Gently hold the following two points (Spleen 2 and Heart 8) for 2 – 3 minutes. Use the tips of your fingers (ideally the index or the middle finger).

Do this one side of the body first, (e.g. your right side) and then repeat the same procedure on the other side of the body, also for 2 – 3 minutes.

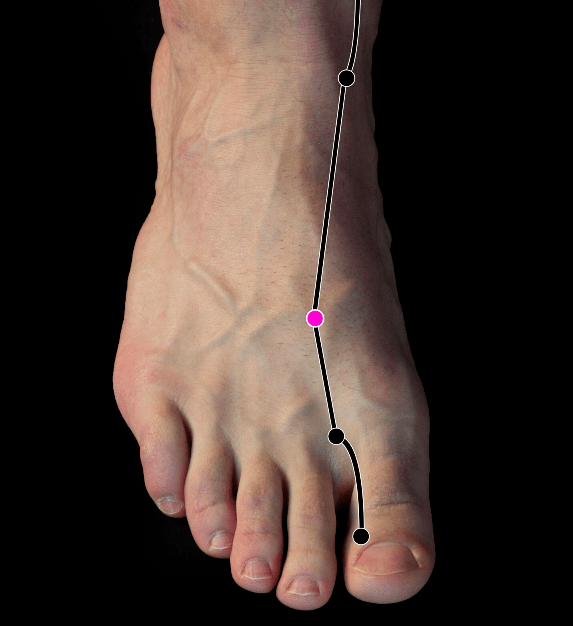
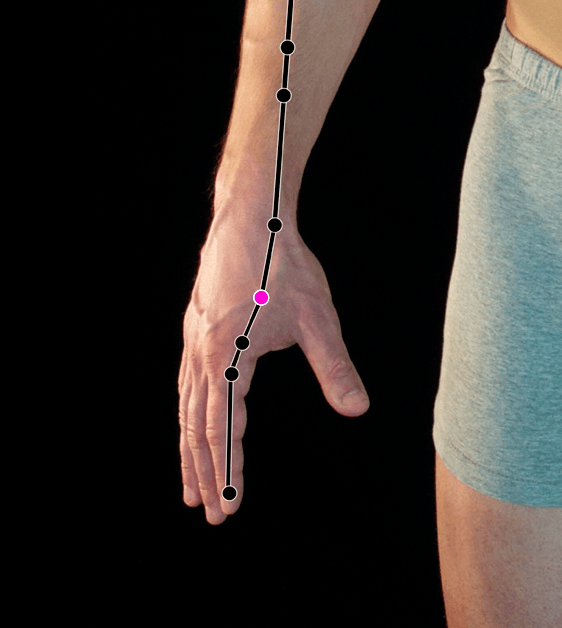
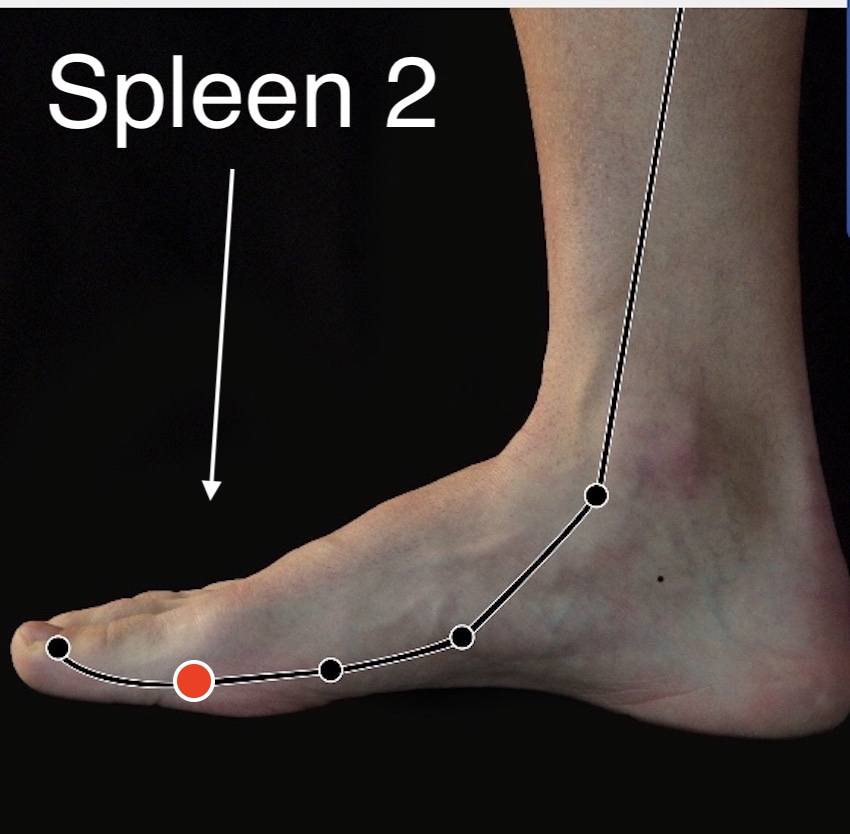
Spleen 2 acupressure point
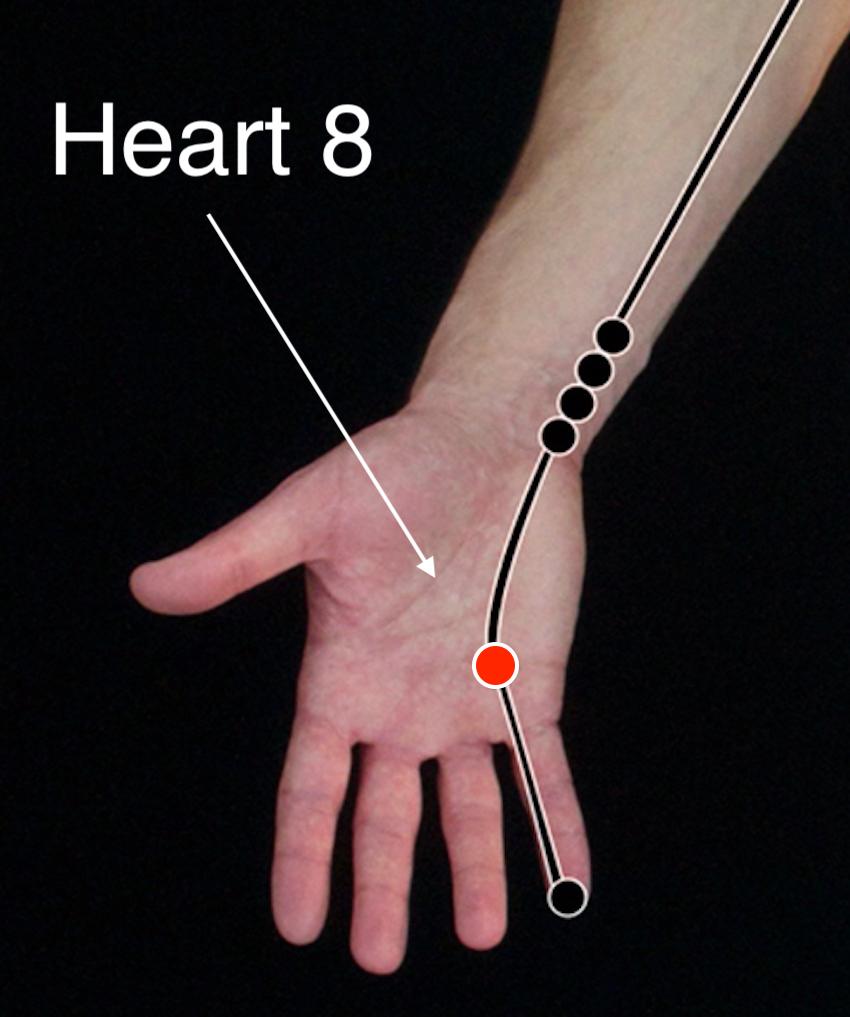
Heart 8 acupressure point

Disclaimer: The images of acupressure points on this page are a part of an interactive acupuncture software/app called POINTS. You can find more information about the software in my review of this app. The images are licensed to Miridia Acupuncture Technology. 

Step 2 – Stabilise the energy flow by holding the control points:

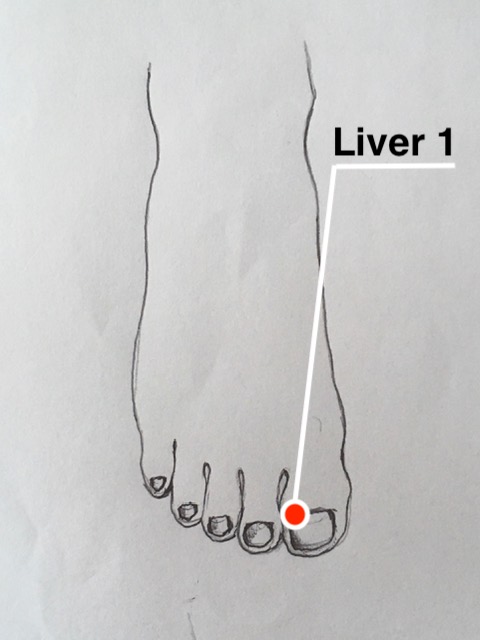
Gently hold the following two points (Spleen 1 and Liver 1) for about 1,5 minutes.

As in the previous step, do this on both sides of the body.

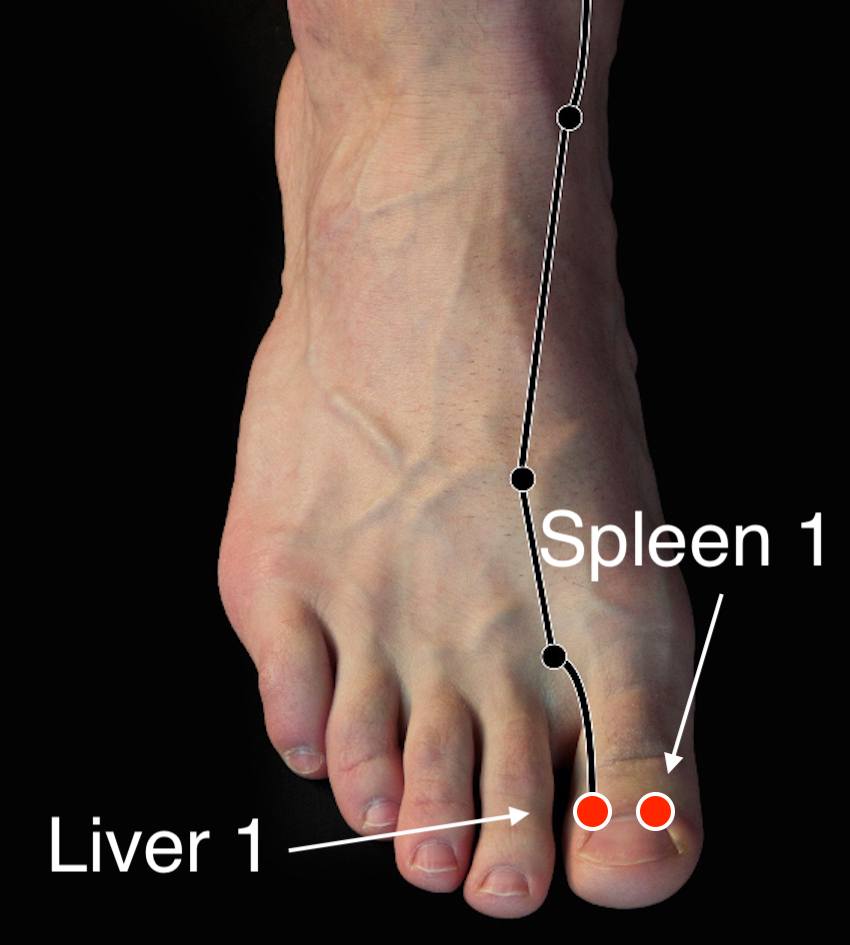
Spleen 1 + Liver 1 acupressure points

Try the Following!

Here are a few selected issues that you may like to work on by using the list below:

Stomach ache: Sedate The Stomach Meridian

Lower back pain: Sedate The Kidney Meridian

Respiratory problems, cough: Strengthen The Lung Meridian

PMS – hormonal imbalances: Three-Point Kidney, Liver and Spleen Meridians

Feeling depressed: Strengthen The Spleen Meridian

Having low immunity: Strengthen The Spleen Meridian

Feeling anxious, having a panic attack: Sedate The Triple Warmer Meridian

Acupressure Sedating, Strengthening, and Stabilising (Control) Points – Full List

Disclaimer: The images of acupressure points on this page are a part of an interactive acupuncture software/app called POINTS. You can find more information about the software in my review of this app. The images are licensed to Miridia Acupuncture Technology. 

The Spleen Meridian

Sedating Points

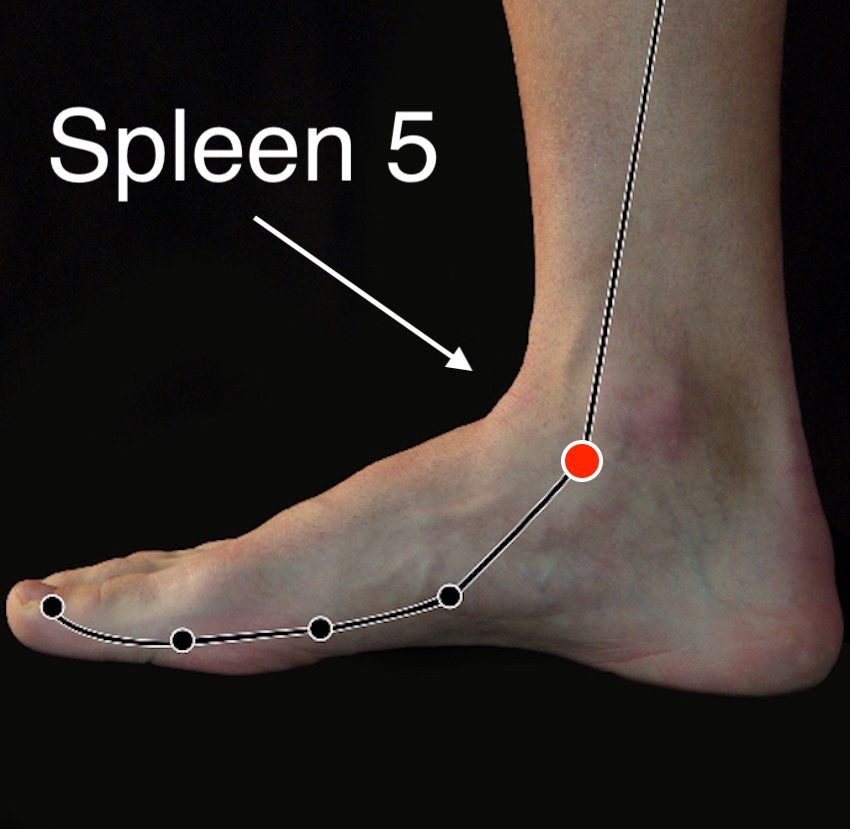
Spleen 5 acupressure point
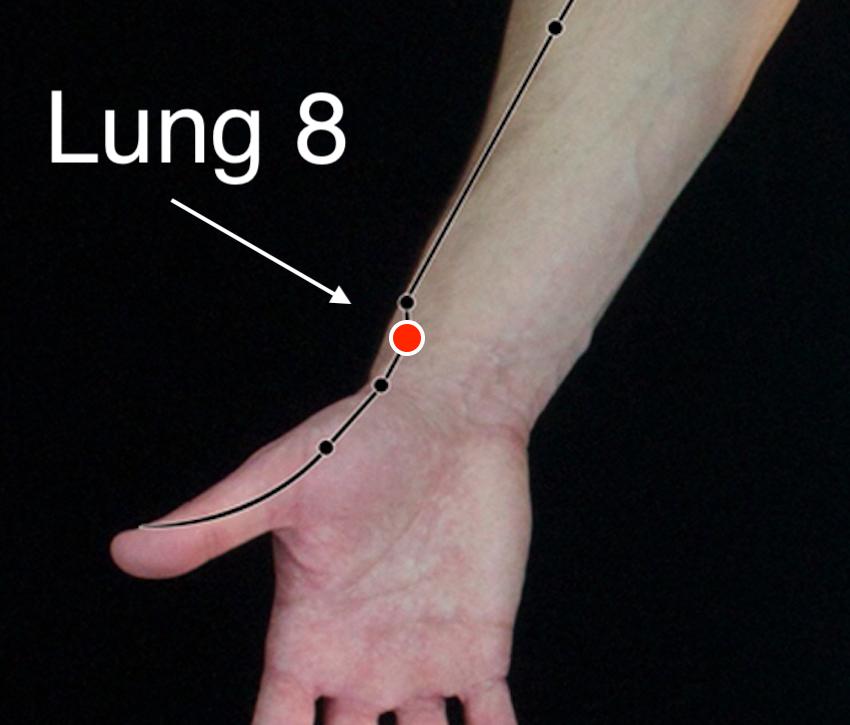
Lung 8 acupressure point

The Spleen Meridian

Strengthening Points

Spleen 2 acupressure point
Heart 8 acupressure point

The Spleen Meridian

Control Points (Stabilising Points)

Spleen 1 + Liver 1 acupressure points

The Heart Meridian

Sedating Points

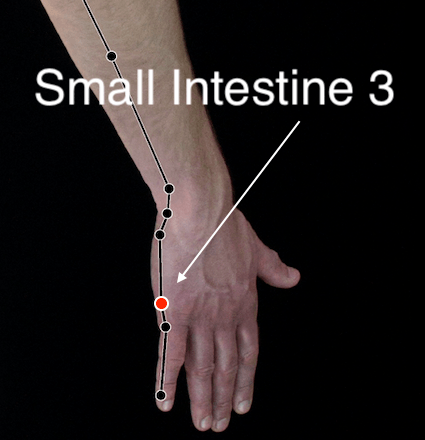
Small Intestine 3 acupressure point
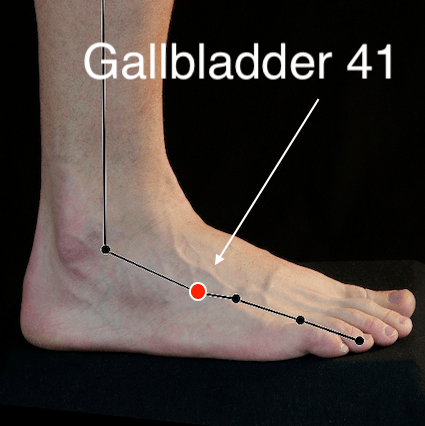
Gallbladder 41 acupressure point

Note: We never directly sedate the Heart meridian. Instead, we use the strengthening points of the neighbouring Small Intestine meridian.

The Heart Meridian

Strengthening Points

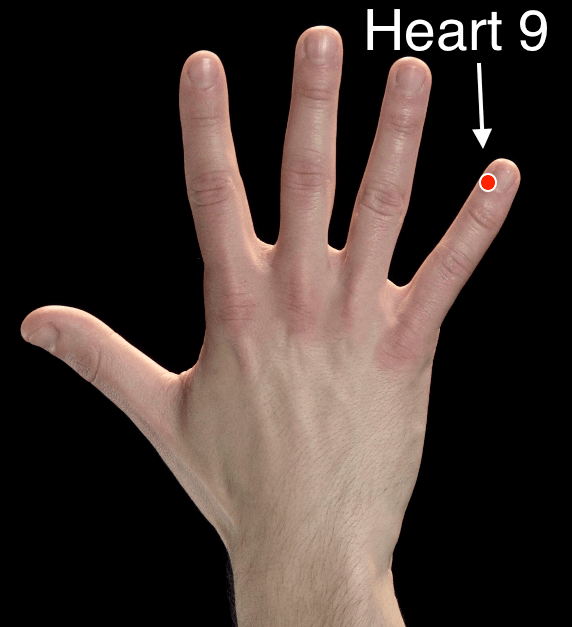
Heart 9 acupressure point
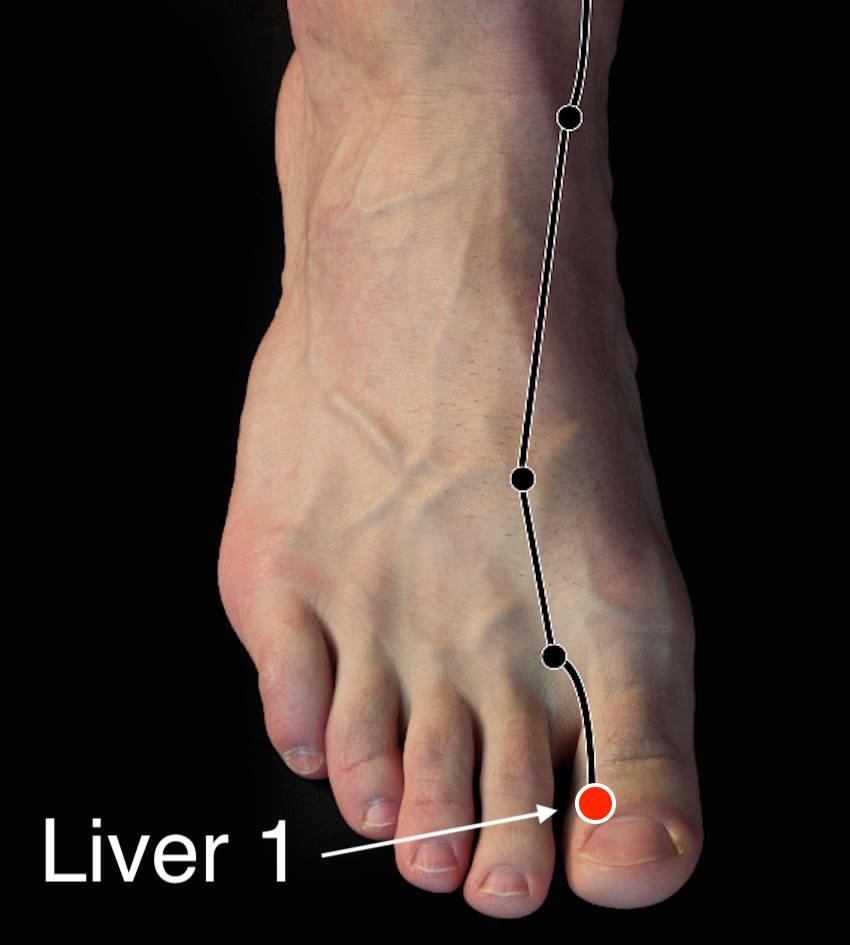
Liver 1 acupressure point

The Heart Meridian

Control Points (Stabilising Points) after strengthening

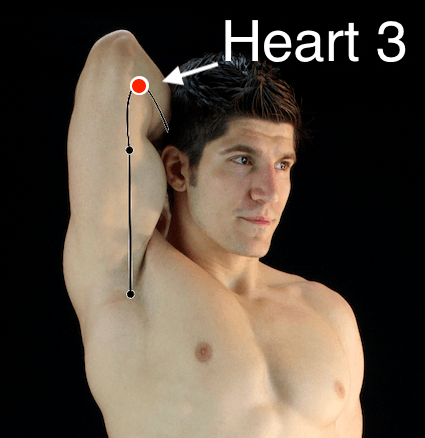
Heart 3 acupressure point
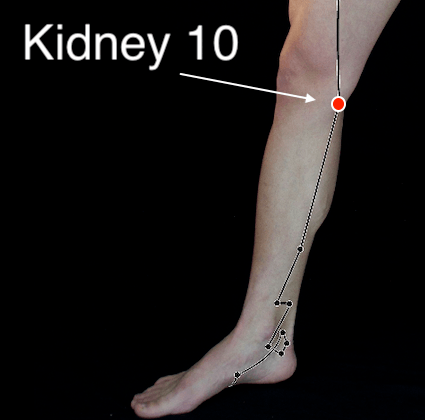
Kidney 10 acupressure point

The Heart Meridian

Control Points (Stabilising Points) after sedating

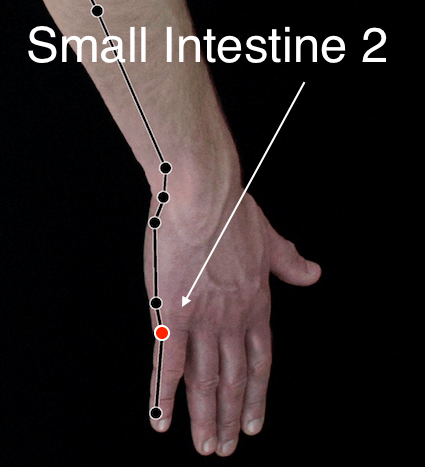
Small Intesstine 2 acupressure point
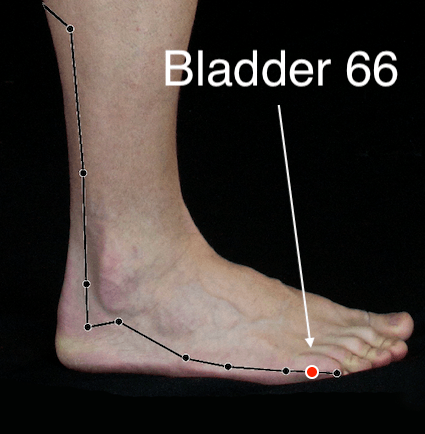
Bladder 66 acupressure point

The Small Intestine Meridian

Sedating Points

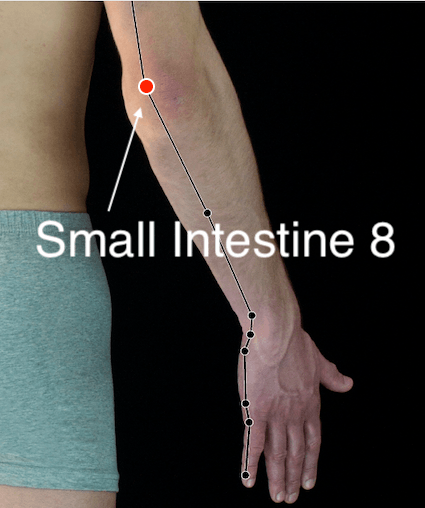
Small Intestine 8 Acupressure Point
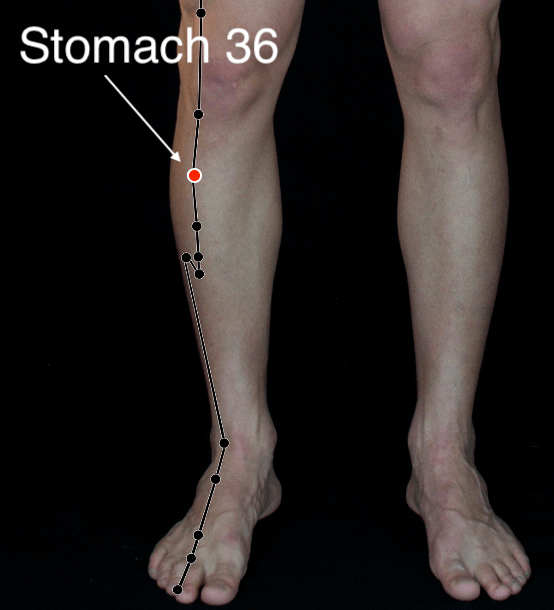
Stomach 36 acupressure point

The Small Intestine Meridian

Strengthening Points

Small Intestine 3 acupressure point
Gallbladder 41 acupressure point

The Small Intestine Meridian

Control Points (Stabilising Points)

Small Intesstine 2 acupressure point
Bladder 66 acupressure point

The Bladder Meridian

Sedating Points 

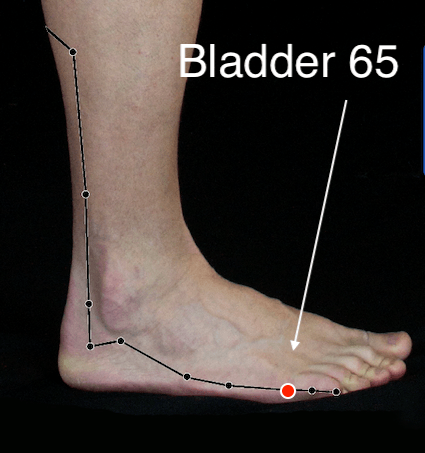
Bladder 65 acupressure point
Gallbladder 41 acupressure point

The Bladder Meridian

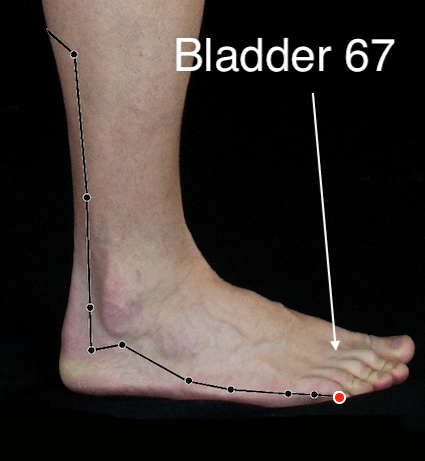
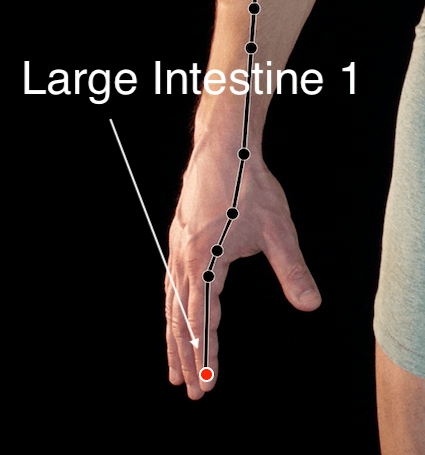
Strengthening Points

Bladder 67 acupressure point
Large Intestine 1 acupressure point

The Bladder Meridian

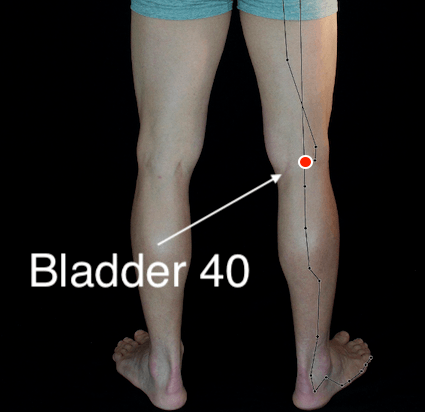
Control Points (Stabilising Points)

Bladder 40 acupressure point
Stomach 36 acupressure point

The Kidney Meridian

Sedating Points

Kidney 1 Acupressure Point
Liver 1 acupressure point

The Kidney Meridian

Strengthening Points

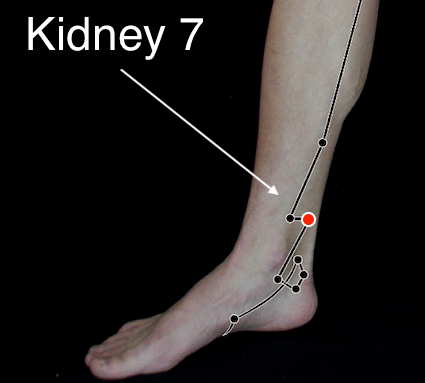
Kidney 7 acupressure point
Lung 8 acupressure point

The Kidney Meridian

Control Points (Stabilising Points)

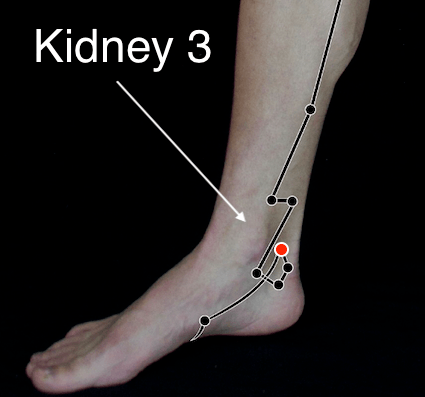
Kidney 3 Acupressure Point
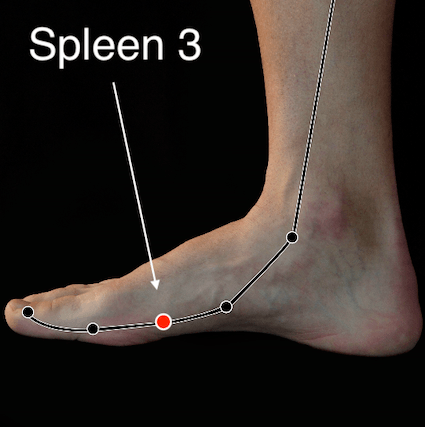
Spleen 3 acupressure point

The Pericardium (or Circulation Sex) Meridian

Sedating Points

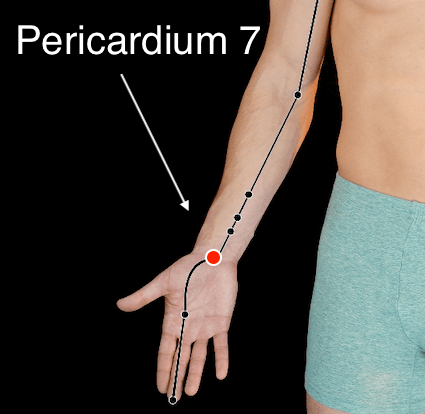
Pericardium 7 Acupressure Point
Spleen 3 acupressure point

The Pericardium (or Circulation Sex) Meridian

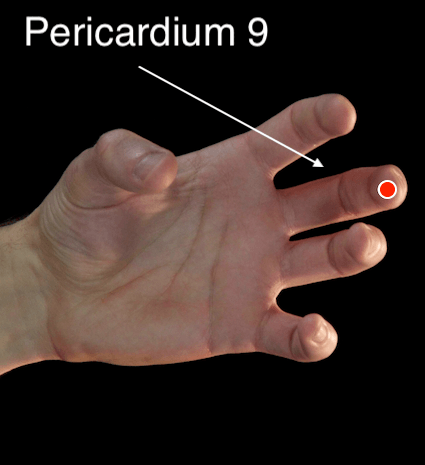
Strengthening Points

Pericardium 9 Acupressure Point
Liver 1 acupressure point

The Pericardium (or Circulation Sex) Meridian

Control Points (Stabilising Points)

Pericardium 3 Acupressure Point
Kidney 10 acupressure point

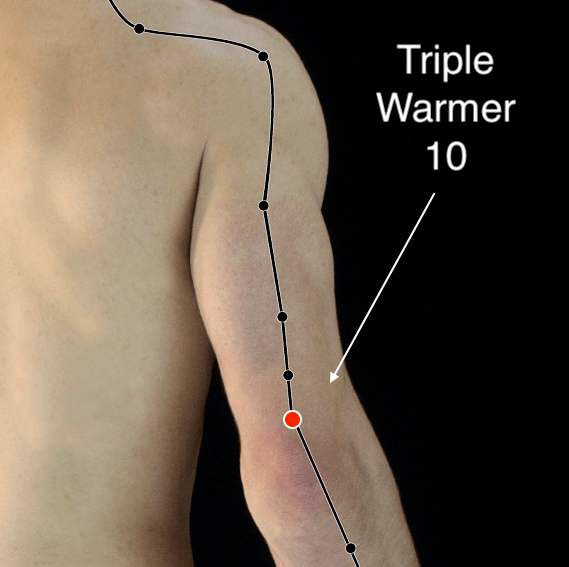
The Triple Warmer Meridian

Sedating Points

Triple Warmer 10 acupressure point
Stomach 36 acupressure point

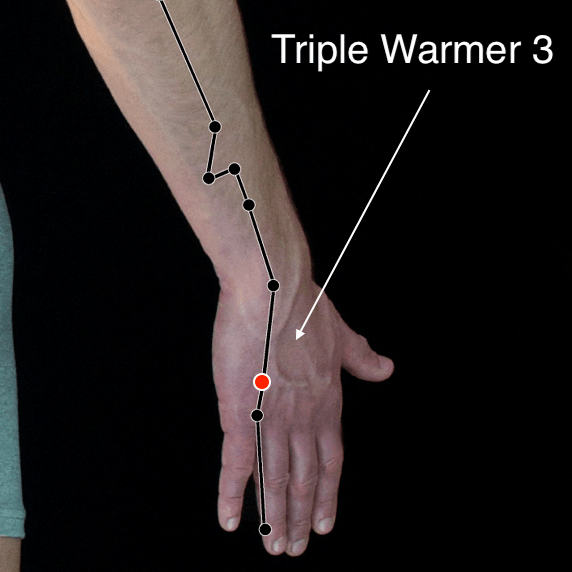
The Triple Warmer Meridian

Strengthening Points

Triple Warmer 3 acupressure point
Gallbladder 41 acupressure point

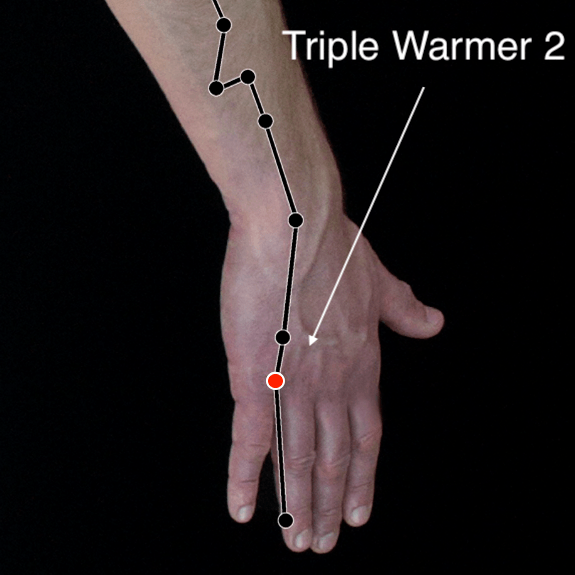
The Triple Warmer Meridian

Control Points (Stabilising Points)

Triple Warmer 2 acupressure point
Bladder 66 acupressure point

The Gallbladder Meridian

Sedating Points

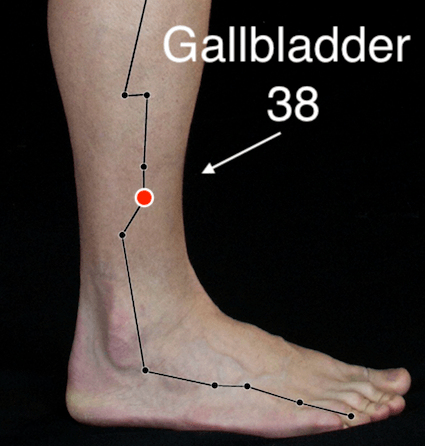
Gallbladder 38 acupressure point
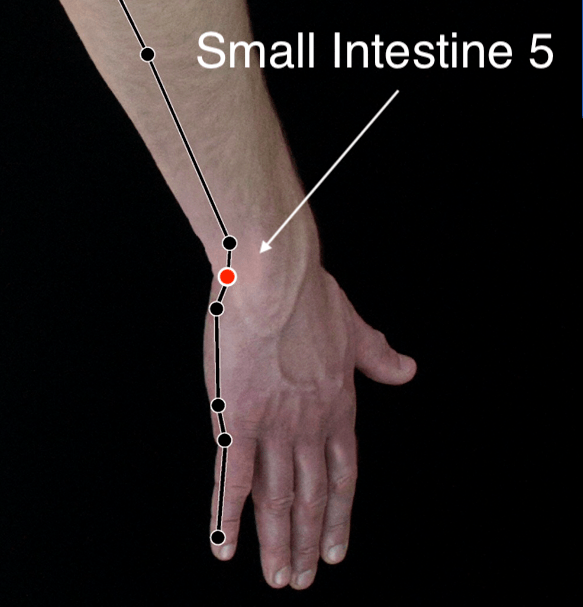
Small Intestine 5 acupressure point

The Gallbladder Meridian

Strengthening Points

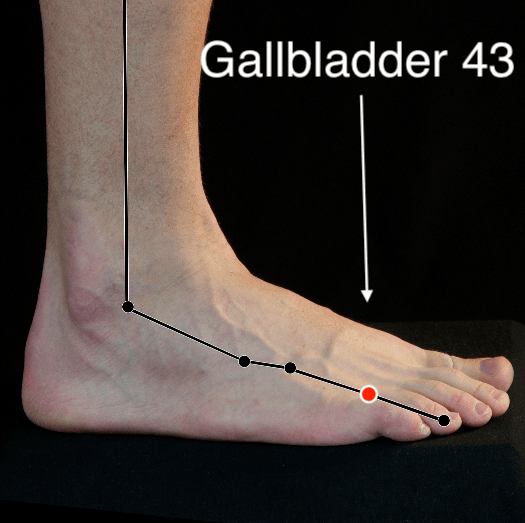
Gallbladder 43 acupressure point
Bladder 66 acupressure point

The Gallbladder Meridian

Control Points (Stabilising Points)

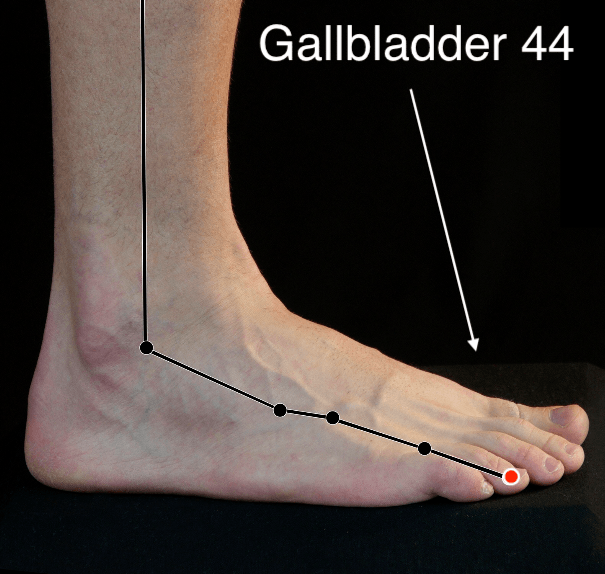
Gallbladder 44 acupressure point
Large Intestine 1 acupressure point

The Liver Meridian

Sedating Points

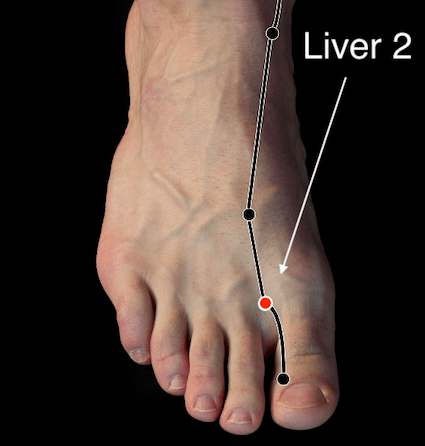
Liver 2 acupressure point
Heart 8 acupressure point

The Liver Meridian

Strengthening Points

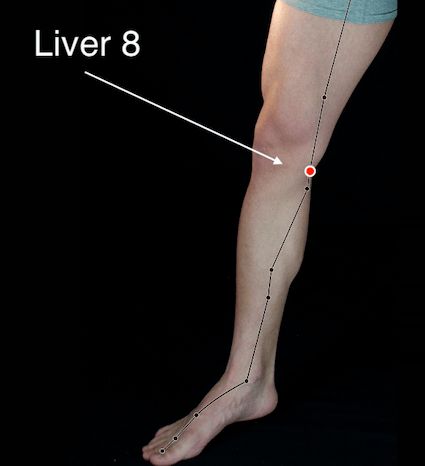
Liver 8 acupressure point
Kidney 10 acupressure point

The Liver Meridian

Control Points (Stabilising Points)

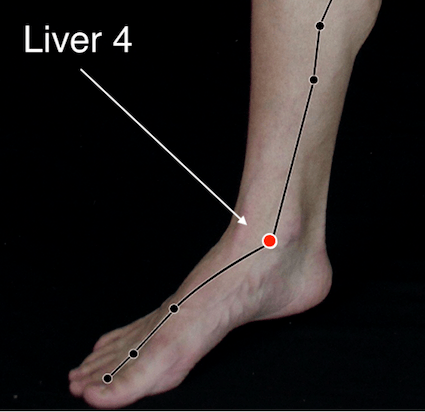
Liver 4 acupressure point
Lung 8 acupressure point

The Lung Meridian

Sedating Points

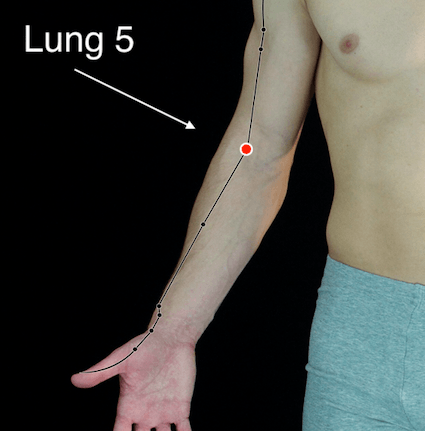
Lung 5 acupressure point
Kidney 10 acupressure point

The Lung Meridian

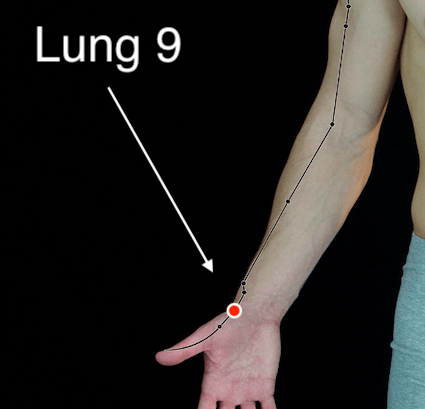
Strengthening Points

Lung 9 acupressure point
Spleen 3 acupressure point

The Lung Meridian

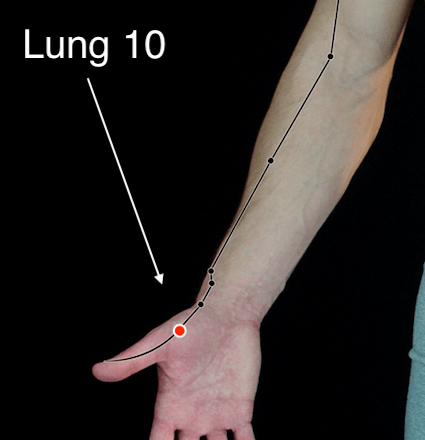
Control Points (Stabilising Points)

Lung 10 acupressure point
Heart 8 acupressure point

The Large Intestine Meridian

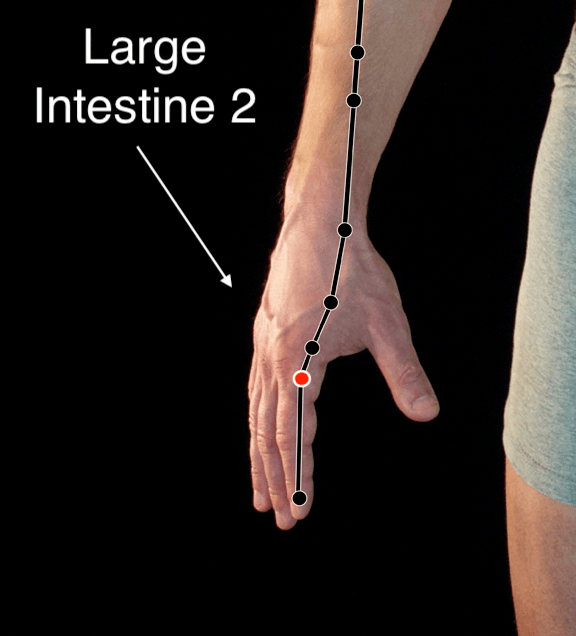
Sedating Points

Large Intestine 2 acupressure point
Bladder 66 acupressure point

The Large Intestine Meridian

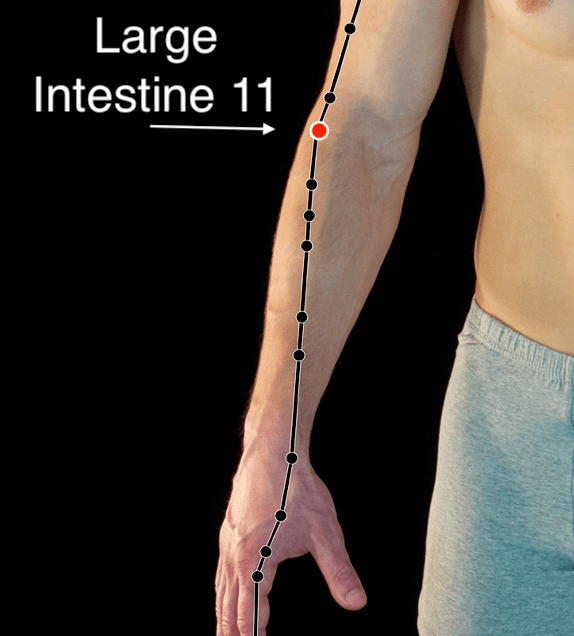
Strengthening Points

Large Intestine 11 acupressure point
Stomach 36 acupressure point

The Large Intestine Meridian

Control Points (Stabilising Points)

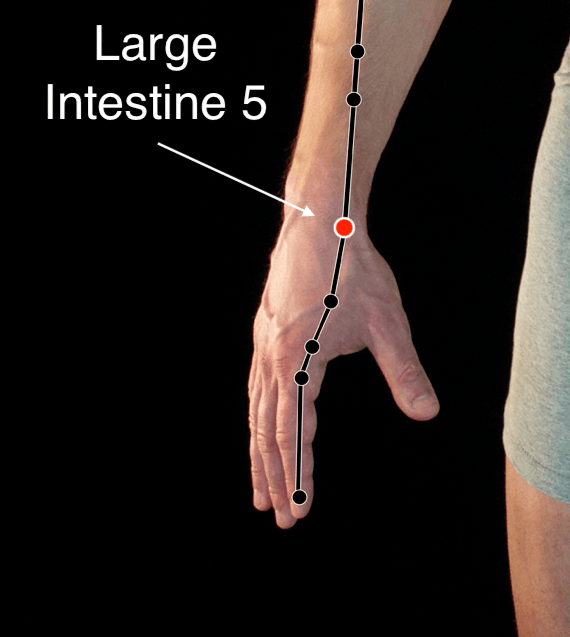
Large Intestine 5 acupressure point
Small Intestine 5 acupressure point

The Stomach Meridian

Sedating Points

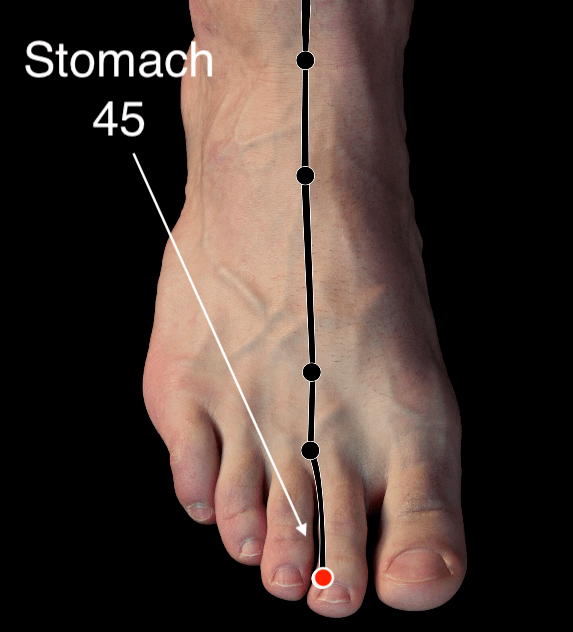
Stomach 45 acupressure point
Large Intestine 1 acupressure point

The Stomach Meridian

Strengthening Points

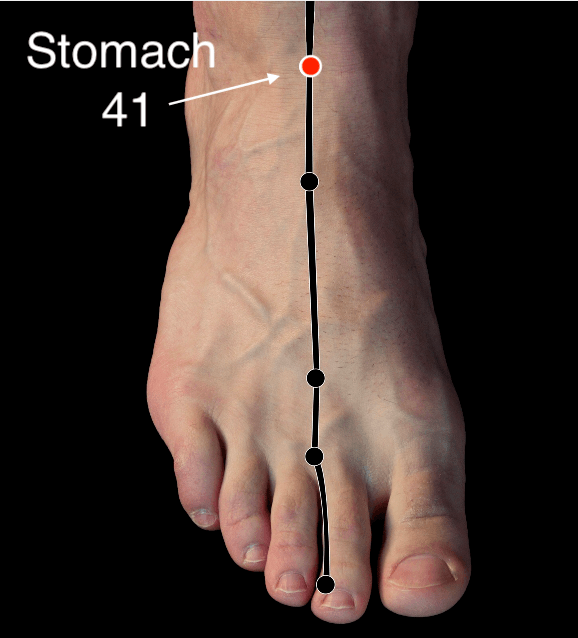
Stomach 41 acupressure point
Small Intestine 5 acupressure point

The Stomach Meridian

Control Points (Stabilising Points)

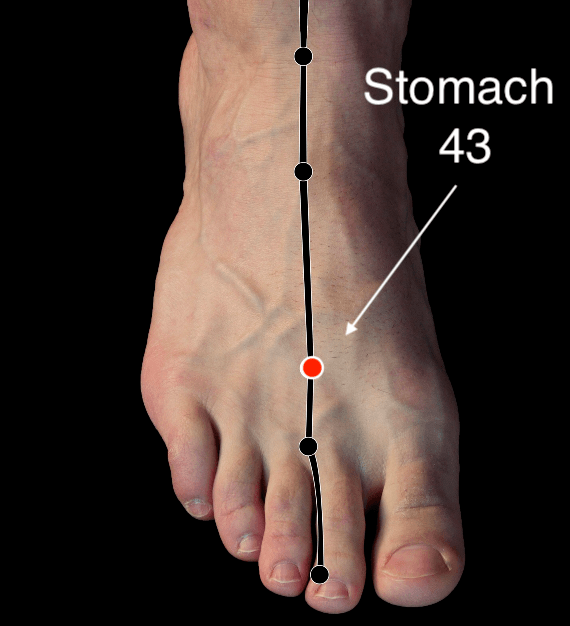
Stomach 43 acupressure point
Gallbladder 41 acupressure point

Learn More About Meridians and Acupressure Points

I hope you enjoyed reading this page. If you’d like to learn more about acupressure points and how to use them, I highly recommend the interactive acupuncture software ‘POINTS’, which has been the source of the acupoint images on this page. You can read my review of this software here: POINTS Review – Acupuncture Points and Charts.

points - interactive acupuncture software

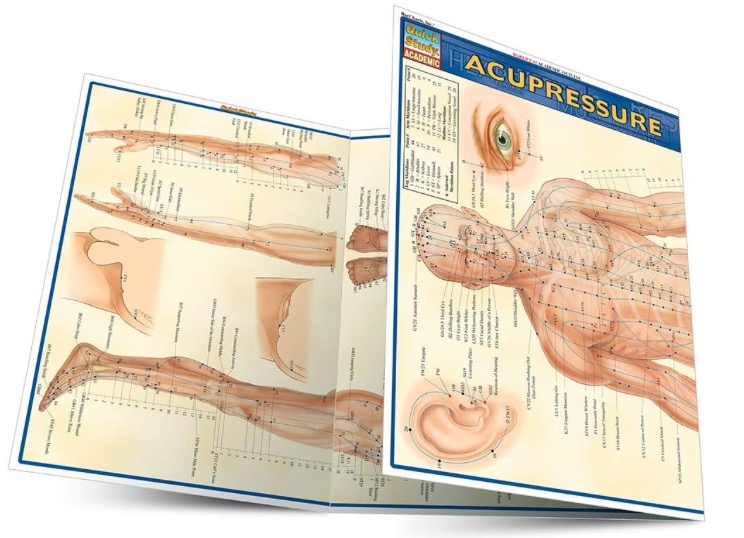
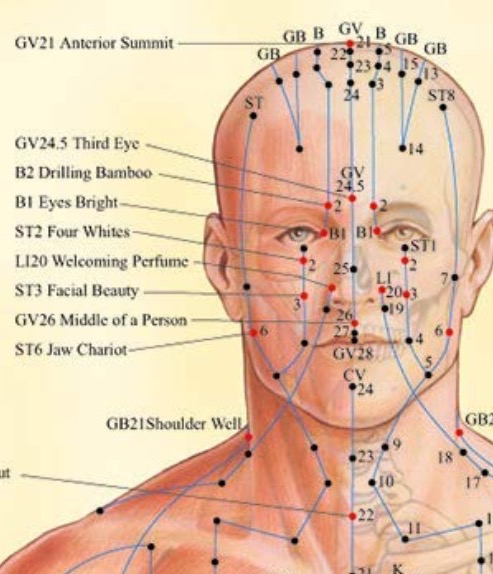
I also highly recommend the folding laminated chart pictured below. It shows every single acupressure point on our body, including the poetic ancient Chinese names for each important point. I’ve found this chart a very valuable study guide, especially during my Energy Medicine Foundation Course.

accupresure points and meridian chart 2

Share Your Thoughts

It would be nice to hear about your experience. Do you have experience with acupuncture or acupressure, and if so, with what results? Let me know your thoughts, questions, or other comments in the comments below and I look forward to getting back to you soon. 

BY LUCIE DUN

This site has been built with DIVI, by Elegant Themes.

RECOMMENDED:

tools-for-energy-healing-practitioners
Online courses and webinars
Meridian Affirmations
Inspirational Books and Audio
Naturegrooves Logo 19

 in alliance with

the shift network logo

Transformational education to awaken your full potential

The Shift Network

Disclaimer: This page contains affiliate links. This means that if you decide to make a purchase through my links, I will earn a small commission at no extra cost to you. (The full Affiliate Disclosure can be read here.) If you’d like to learn more about affiliate marketing, e.g. how to earn extra income from blogging and promoting products you like and would recommend to others, which is what I do, check out Wealthy Affiliate, my favourite platform for online marketers. You can create a free account, which will enable you to make your own website in a few simple steps, and host it with them – free of charge – for as long as you like. You can test it right now by trying their free website builder SiteRubix. Thank you for visiting!

Free starter membership with Wealthy Affiliate

The Kidney Meridian

The Kidney Meridian

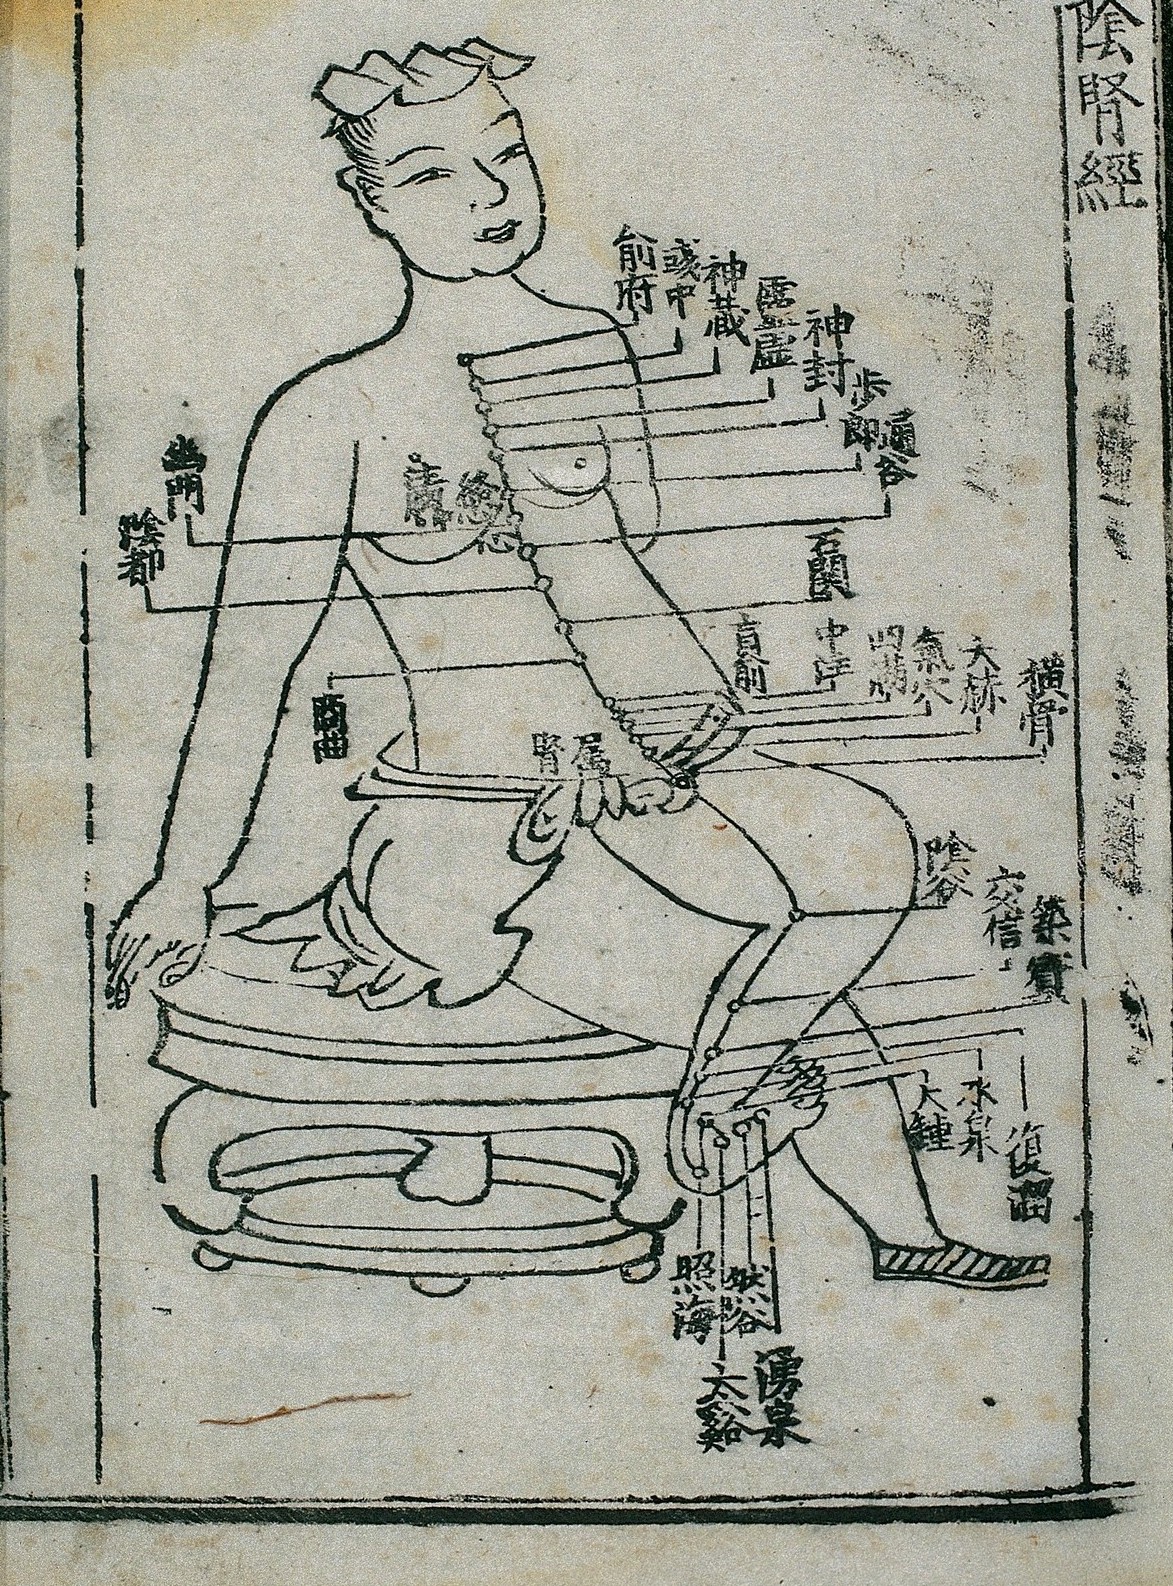
Kidney Meridian by Wellcome Collection

In this post, I will share several ancient-healing techniques for working with the Kidney meridian. They are very simple yet powerful, and you will be able to try them immediately. These techniques cause a shift of energy which might energise you, relieve you from physical pain or diminish fearful feelings.

Reservoir of Energy and Centre of Courage

Traditional Chinese medicine regards the Kidney meridian as a reservoir of energy, as well as the centre of courage and willpower. Conversely, a dysfunction in Kidney meridian can result in feeling extremely tired, being overcome by emotions of fear or paranoia, or symptoms and ailments such as asthma, chronic inflammation, or tinnitus.

The good news is that we have tools to keep the Kidney meridian in balance, and thus enjoy a healthy energy flow, vitality, willpower, and courage to move forward in life.

The Pathway of Kidney Meridian

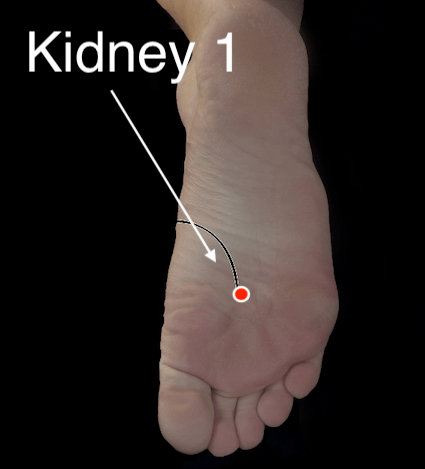
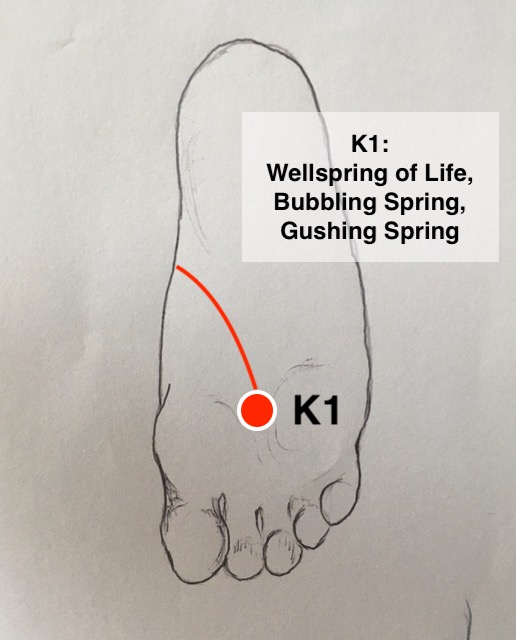
The pathway of the Kidney meridian starts under your foot, on its first acupressure point where energy enters the body. The point is called Kidney 1 (or K1). In the old Chinese medical terminology, which is much more poetic than modern medicine, the point is known as ‘The Wellspring of Life’, ‘Bubbling Spring’, or ‘Gushing Spring’.

Pressing or massaging it can bring you ‘back to life’. In fact, the master practitioner of energy medicine, Donna Eden, has described a situation when an unconscious, dying person was brought back to life after this technique was applied. (Energy Medicine, by Donna Eden, pg 125) 

Kidney 1 Acupressure Point

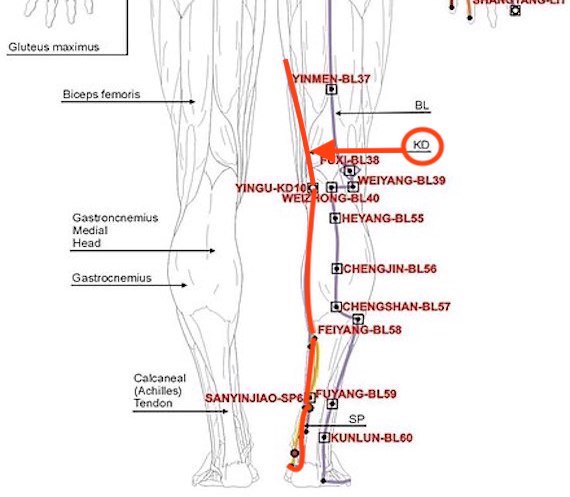
The Kidney meridian pathway then circles around your ankle, goes up via the back of the legs, and reemerges at the front of the body.

Kidney meridian back view

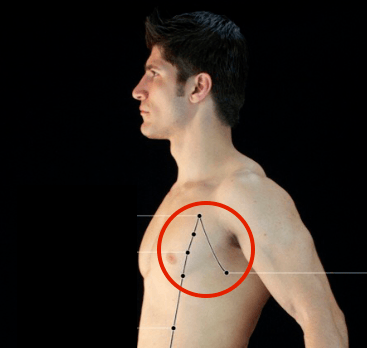
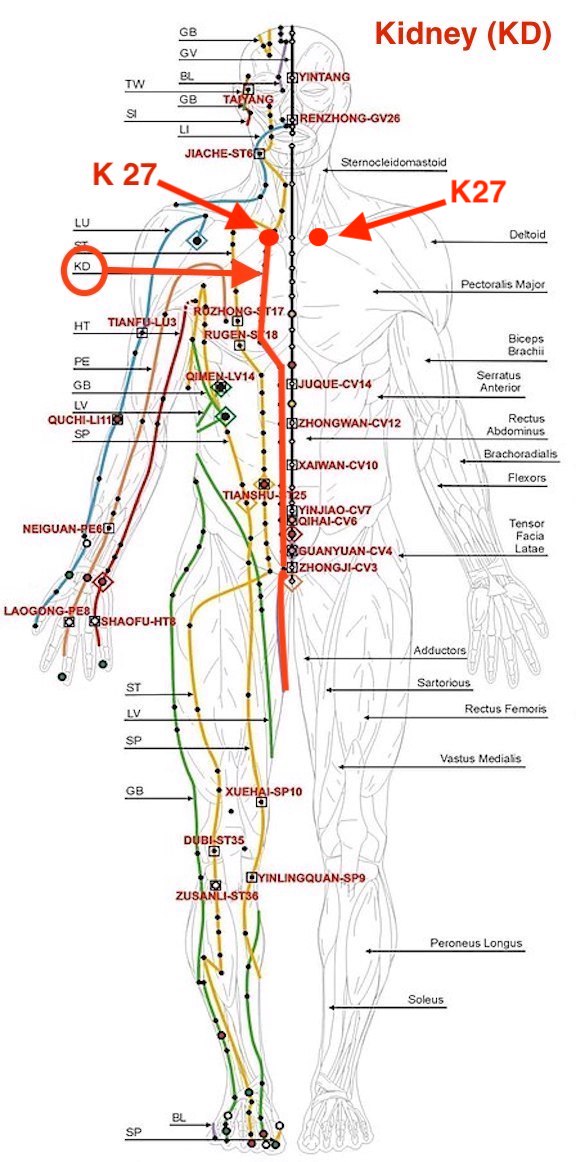
The meridian then flows up your body all the way under your clavicle. It finishes on the last (and very important) set of acupressure points called K 27.

The K27 are very important points, because they are is a junction point for all the other meridians and you can influence how you feel by working with these points. The K 27 are considered the “energy switch” of the body: If you thump or deeply massage these points, it will stimulate the energies of all the other meridians and get your body’s energy moving.

You will find these points right under the collarbone, near the U-shaped notch. Massage these points vigorously to bring fresh energy to your body. Remember this next time you’re feeling tired! Thump or deeply massage these points and you will soon feel the difference.

Kidney meridian front view

Please note: Although this diagram shows the pathway on only one side of the body for clarity purposes, in reality it runs on both sides of the body, right and left, in a pair. So if you’re massaging the K27, you’ll be massaging a set of two points (as in the picture below). The path of the Kidney meridian is marked in red colour.

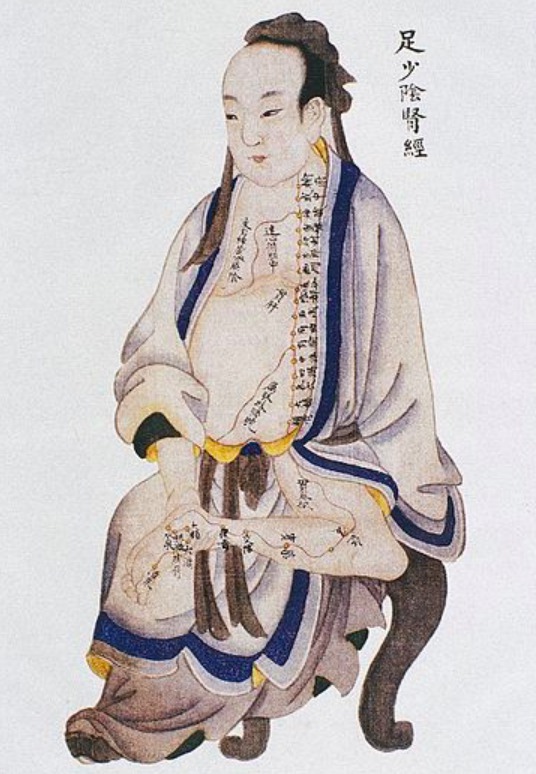
Ancient Prints Showing Meridians

I find it fascinating to compare modern acupuncture/acupressure diagrams with ancient Chinese prints and paintings. Nowadays, we have devices that can detect meridians and their acupoints, and they are almost exactly the same as depicted ion the thousands’ of years-old medical illustrations. There are also people who can see energies, such as Donna Eden, who was born with this ability. She had seen meridian pathways even before she learned about them!

Kidney Meridian by Wellcome Collection

If Kidney Meridian is Out of Balance

In the traditional Chinese medicine, the emotion associated with Kidney meridian is fear.

When we experience a strong emotion of fright, our kidneys will struggle to hold their energy and we can even end up experiencing involuntary urination. (You’ve surely heard the phrase ‘I nearly peed myself’!)

Dealing with long-term fear can often result in kidney issues.

The other challenges associated with imbalance in the Kidney meridian are fear, edema, eye problems, tinnitus, lung problems, dry tongue, lumbago, constipation, diarrhoea, lower back pain during period, shoulder pain, and pain along the course of the meridian and its associated muscles.

However, working with the Kidney meridian and its acupressure points can often help you relieve pain and improve your health condition, and emerge from loneliness, depression, and fear.

Techniques for Balancing Kidney Meridian

If you suffer from any of the symptoms mentioned above, try the following techniques: 

  • Trace Kidney meridian
  • Flush Kidney meridian
  • Work with the acupressure points of Kidney meridian

Tracing Kidney Meridian

Tracing Kidney meridian will help you get your energy going and remove toxins out of your body.

Donna Eden’s daughter Dondi shows you how to trace Kidney meridian.

Flushing Kidney Meridian

How to flush a meridian:

  • Trace it backward once
  • Trace it forward three times


Working with the Acupressure Points of Kidney Meridian

There are three ways we can work with the acupressure points:

  • Sedate
  • Strengthen
  • Use the Three-Point Technique

Below I am showing diagrams that will teach you how to sedate or strengthen the Kidney meridian, according to your needs. If you are in pain, it usually means that there is too much accumulated energy in your Kidney meridian, so holding the sedating points of the Kidney meridian would be your choice. It will also help release toxins from the meridian.

Sedating Kidney Meridian

I have successfully used this technique to help a friend with strong lower back pain during her period. If you suffer from back pain (whatever the cause), or shoulder pain, do try this technique.

Step 1 – Sedate the Kidney Meridian:

Sedate (relax) the Kidney meridian by sending its excess energy to the next meridian, which is Liver. You’ll see how the flow works on the wheel diagram (The Five Elements Wheel) further down.

The Procedure:

Gently hold the following two points (Kidney 1 and Liver 1) for 2 – 3 minutes. Use the tips of your fingers (preferably the index or the middle finger).

Do this one side of the body first, (e.g. on your right foot).

Repeat the same procedure on the other side of the body (your left foot), also for 2 – 3 minutes.

Kidney 1 Acupressure Point
Liver 1 Acupressure Point

What Is Happening on The Five Elements Wheel:

Water element (Kidney meridian) flows into Wood element (Liver meridian).

This means that Kidney meridian is freed from excess energy by sending it to Liver meridian.

Or you can view it the other way – the helpful friend Liver is ‘hoovering’ excess energy from the overcharged Kidney meridian, this helping the Kidney meridian to relax. (This often diminishes pain in our body, like in the case of my friend with the back pain.)

You can see this happening on the wheel (from blue to green, inside the circle):

kidney to liver flow

Step 2 – Stabilise the Energy Flow by Holding the Control Points:

Now we need to stop the flow of energy from the previous point. We need to stabilize the shift in energy, and we’ll do this by holding the so-called control points.

The Procedure:

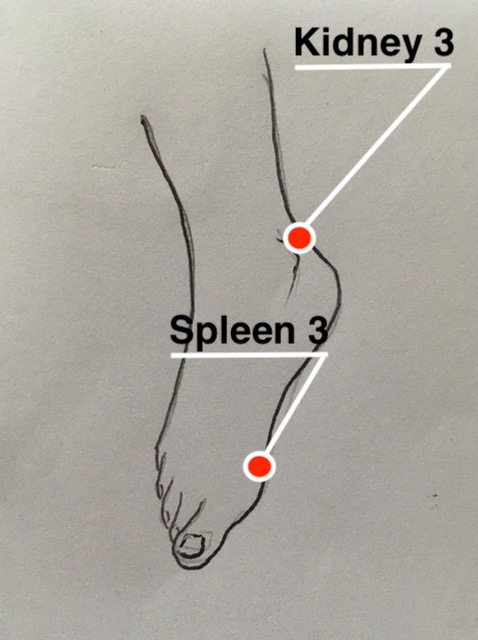
Gently hold the following two points (Kidney 3 and Spleen 3) for 1,5 minutes.

As in the previous step, do this on both sides of the body; on the right foot first, then on the left foot. (Or vice versa.)

Spleen 3 and Kidney 3 Acupressure Point

What is happening on The Five Elements Wheel:

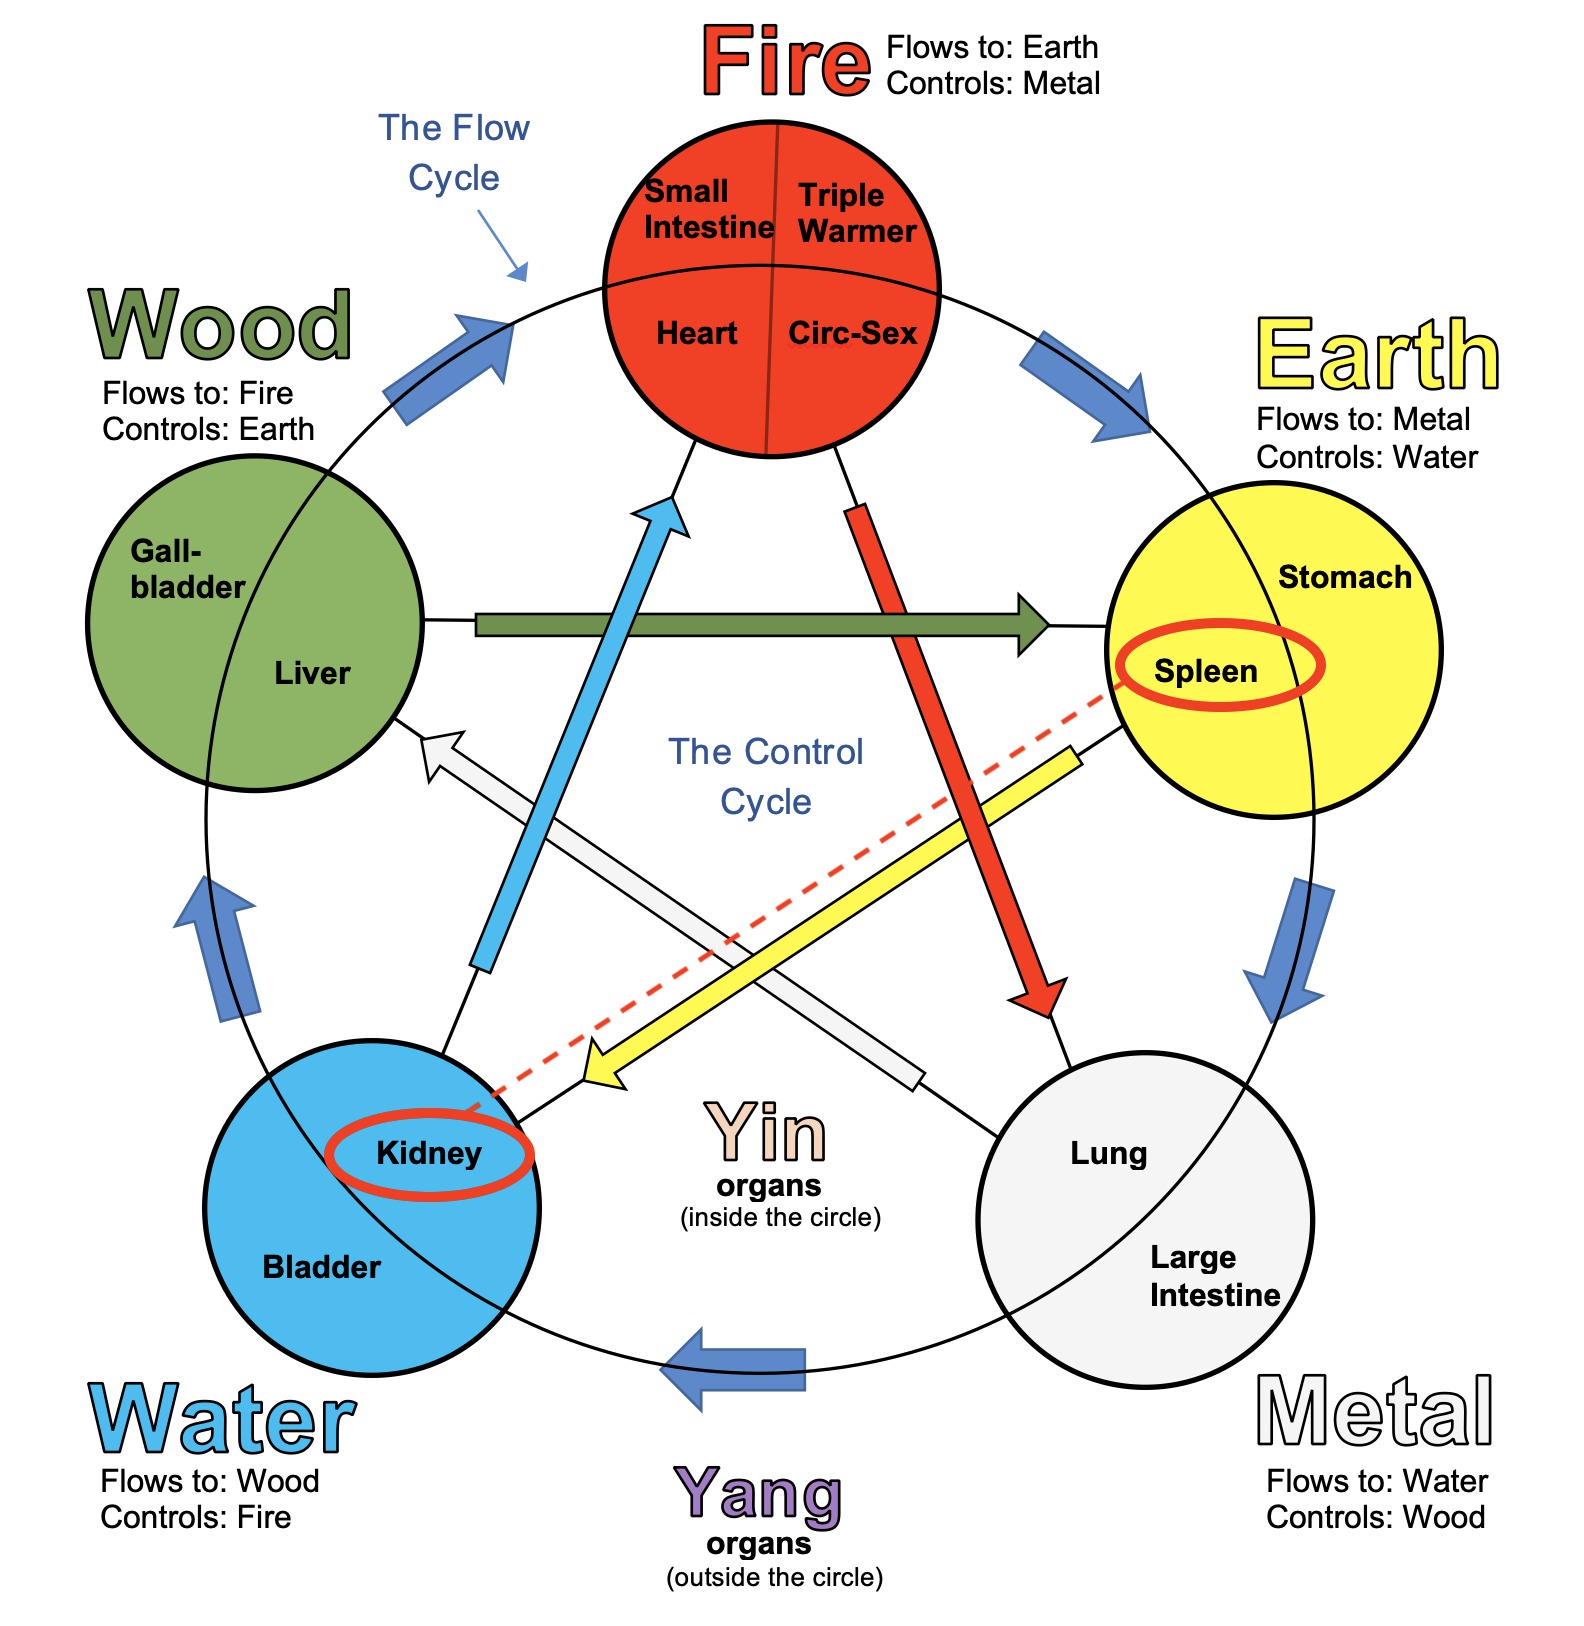
Earth element (Spleen) controls Water element (Kidney).

This means that ‘good cop’ Spleen meridian will ‘stop’ the flow of energy from the previous step, thus preventing the Kidney meridian from having too much energy taken away. This wise intervention of the controlling element (Earth) will stabilise the energies.

You can see this happening on the wheel (from yellow to blue, inside the circle):

Spleen to kidney

Strengthening Kidney Meridian

Step 1 – Strengthen the Kidney Meridian 

Strengthen the Kidney meridian by borrowing some energy from the previous meridian (i.e. Lung meridian).

The Procedure:

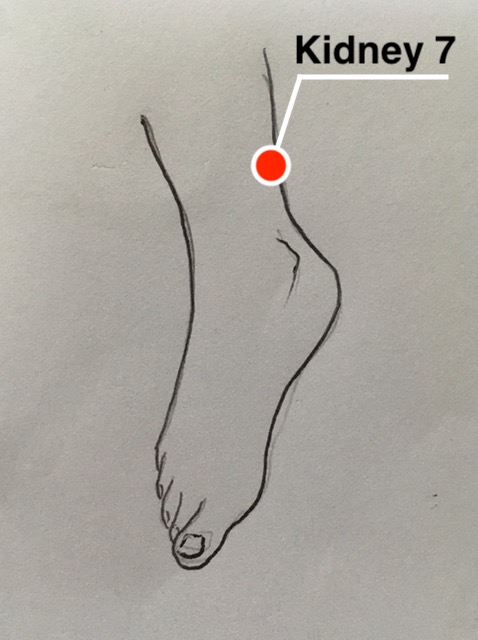
Gently hold the following two points (Kidney 7 and Lung 8) for 2 – 3 minutes. Use the tips of your fingers (preferably the index or the middle finger).

Do this one side of the body first, (e.g. your right side) and then repeat the same procedure on the other side of the body, also for 2 – 3 minutes.

Kidney 7 Acupressure Point
Lung-8-Acupressure-Point

What Is Happening on The Five Elements Wheel:

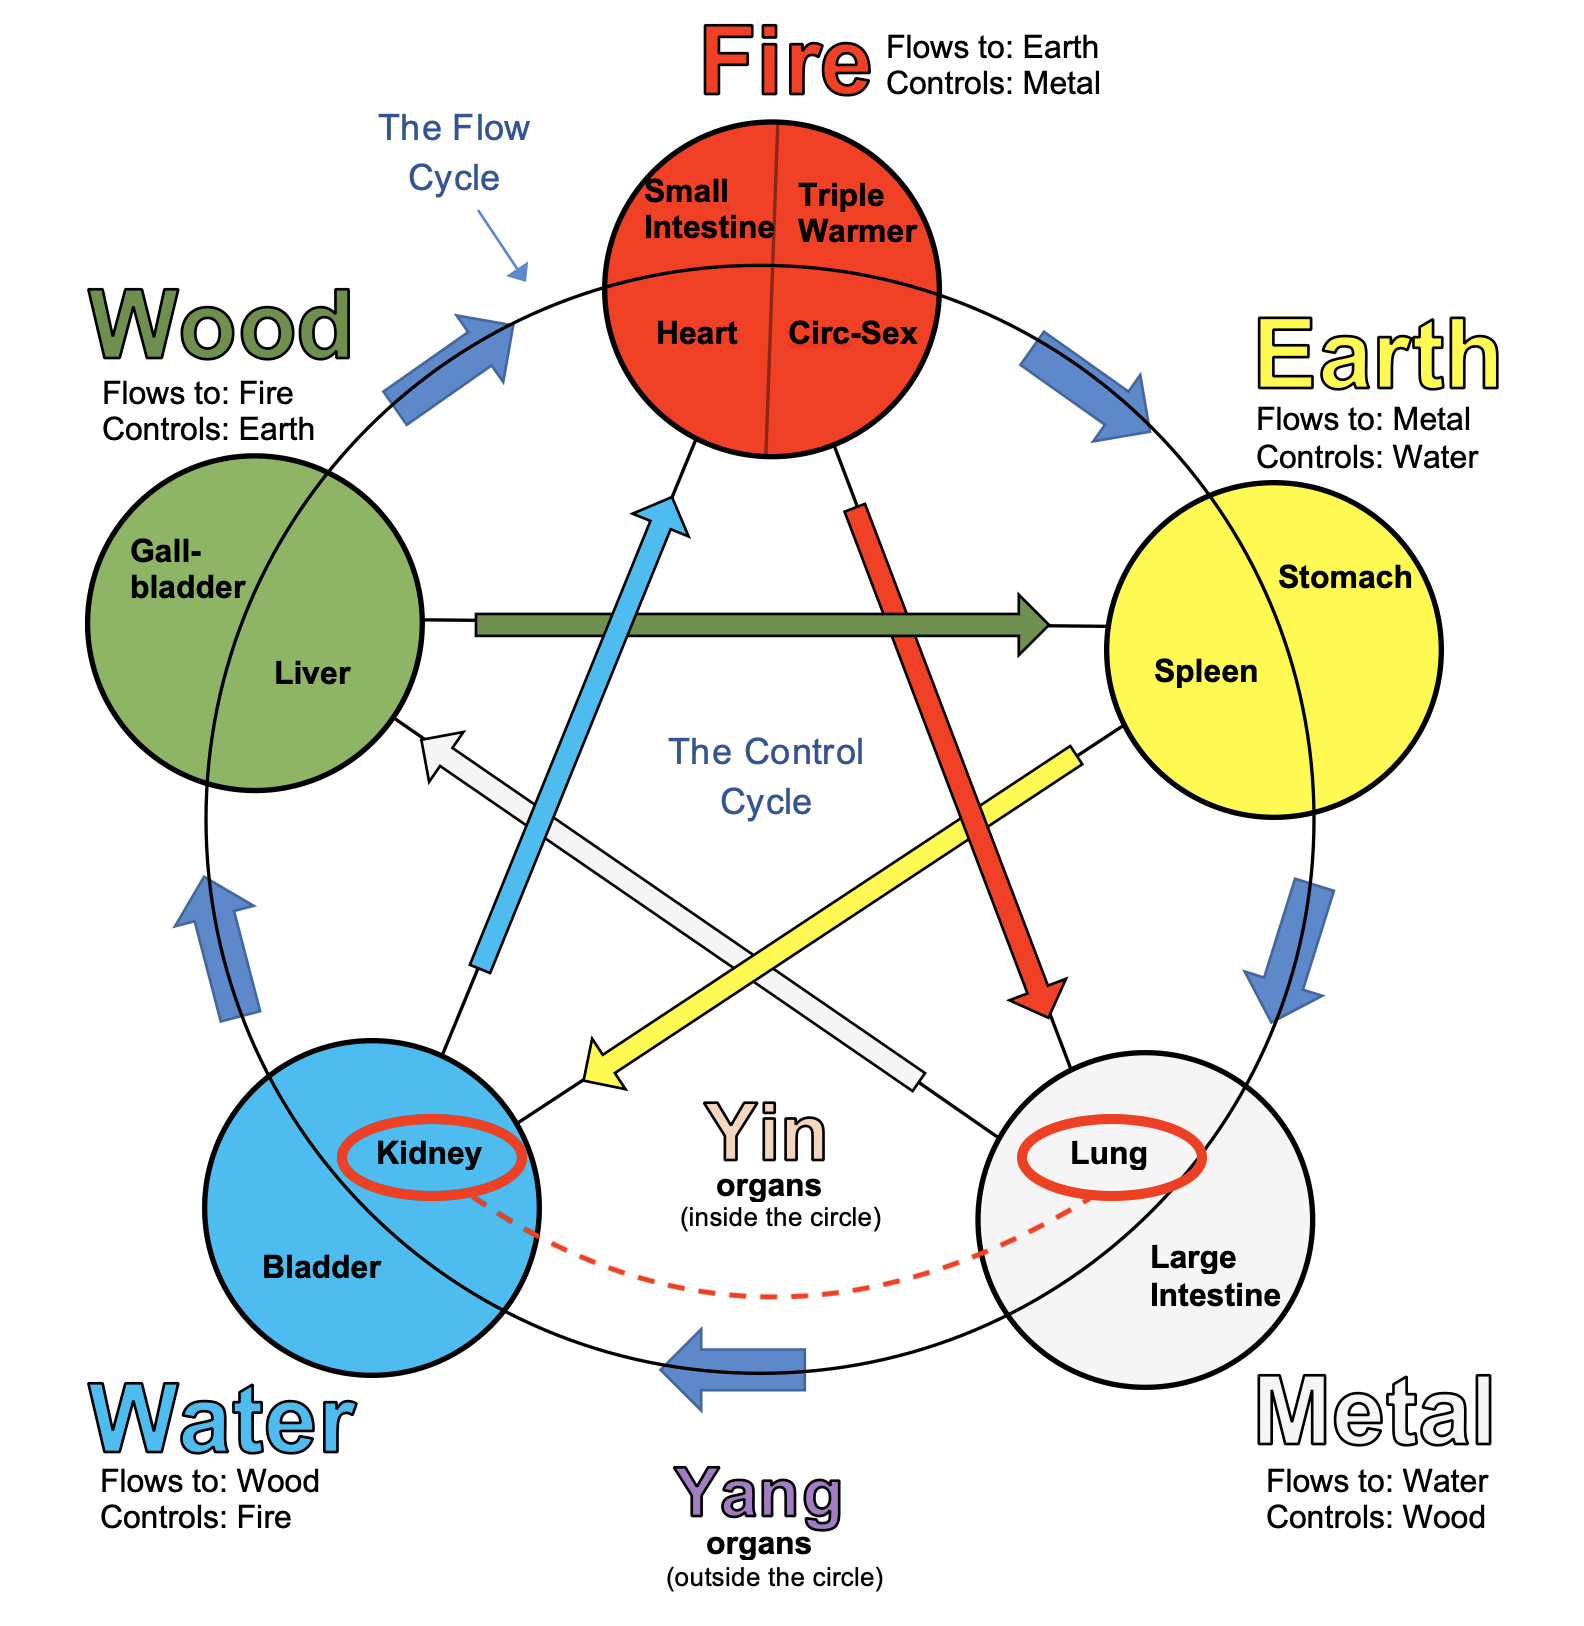
Metal element (Lung) flows into Water element (Kidney).

This means that Lung meridian is strengthening the neighbouring Kidney meridian by sending its energy into it (flowing into it).

Or you can view it the other way – Kidney is ‘borrowing’ some energy from its neighbouring Lung meridian.

You can see this happening on the wheel (from light grey to blue, inside the circle):

Lung to Kidney

Step 2 – Stabilise the energy flow by holding the control points:

Gently hold the following two points (Kidney 3 and Spleen 3) for about 1,5 minutes.

As in the previous step, do this on both sides of the body.

Spleen 3 and Kidney 3 Acupressure Point

What Is Happening on The Five Elements Wheel:

Earth element (Spleen) controls Water element (Kidney).

You can see this happening on the wheel (from yellow to blue, inside the circle).

Spleen to kidney

You may have noticed that this is the same procedure as when we were holding the control points after the Sedating procedure in the first example. The control points are always the same after sedating and strengthening a meridian.

Three-Pointing Kidney Meridian

The Three Point Technique is a combination of sedating and strengthening a meridian in one session. Sometimes a meridian needs to be cleared of stale or toxic energies first in order to receive strengthening energies. This means that we sedate it first to move the old energies out, and then strengthen it. In the end, we use the control points to stabilise the shift.

We often use the Three-Point technique to treat hormonal imbalances, such as during PMS or menopause.

Step 1 – Sedate the Kidney Meridian:

Sedate (relax) the Kidney meridian by sending its excess energy to the next meridian, which is Liver. You’ll see how the flow works on the wheel diagram (The Five Elements Wheel) further down.

The Procedure:

Gently hold the following two points (Kidney 1 and Liver 1) for 2 minutes. Use the tips of your fingers (preferably the index or the middle finger).

Do this one side of the body first, (e.g. on your right foot).

Repeat the same procedure on the other side of the body (your left foot), also for 2 minutes.

Kidney 1 Acupressure Point
Liver 1 Acupressure Point

What Is Happening on The Five Elements Wheel:

Water element (Kidney meridian) flows into Wood element (Liver meridian).

This means that Kidney meridian is freed from excess energy by sending it to Liver meridian.

Or you can view it the other way – the helpful friend Liver is ‘hoovering’ excess energy from the overcharged Kidney meridian, this helping the Kidney meridian to relax. (This often diminishes pain in our body, like in the case of my friend with the back pain.)

You can see this happening on the wheel (from blue to green, inside the circle):

kidney to liver flow

Step 2 – Strengthen the Kidney Meridian 

Strengthen the Kidney meridian by borrowing some energy from the previous meridian (i.e. Lung meridian).

The Procedure:

Gently hold the following two points (Kidney 7 and Lung 8) for 2 minutes. Use the tips of your fingers (preferably the index or the middle finger).

Do this one side of the body first, (e.g. your right side) and then repeat the same procedure on the other side of the body, also for 2 minutes.

Kidney 7 Acupressure Point
Lung-8-Acupressure-Point

What Is Happening on The Five Elements Wheel:

Metal element (Lung) flows into Water element (Kidney).

This means that Lung meridian is strengthening the neighbouring Kidney meridian by sending its energy into it (flowing into it).

Or you can view it the other way – Kidney is ‘borrowing’ some energy from its neighbouring Lung meridian.

You can see this happening on the wheel (from light grey to blue, inside the circle):

Lung to Kidney

Step 3 – Stabilise the energy flow by holding the control points:

Now we need to stop the flow of energy from the previous two points. We need to stabilize the shift in energy, and we’ll do this by holding the control points.

The Procedure:

Gently hold the following two points (Kidney 3 and Spleen 3) for 1 minute.

As in the previous step, do this on both sides of the body; on the right foot first, then on the left foot. (Or vice versa.)

What Is Happening on The Five Elements Wheel:

Earth element (Spleen) controls Water element (Kidney).

You can see this happening on the wheel (from yellow to blue, inside the circle).

Spleen to kidney

Learn More About Meridians and Acupressure Points

I hope you enjoyed reading about ‘The Wellspring of Life’, the mighty Kidney meridian. If you’d like to learn about all the ancient Chinese poetic names of the acupressure points, I highly recommend getting the folding laminated chart pictured below.  It shows every single acupressure point on our body, so it’s a brilliant study guide. I found it incredibly useful during my Energy Medicine Foundation Course.

accupresure points and meridian chart 2

Share Your Thoughts

I would also love to hear about your experience – have you used the techniques mentioned here, and with what results? Or have you got any other questions or comments? Let me know your thoughts in the comments below and I look forward to getting back to you soon. To your amazing health!

BY LUCIE DUN

This site has been (very happily) built with DIVI, by Elegant Themes.

Disclaimer: Some pages on my website contain affiliate links. This means that if you decide to make a purchase through my links, I will earn a small commission at no extra cost to you. (The full Affiliate Disclosure can be read here.) If you’d like to learn more about affiliate marketing, e.g. how to earn extra income from blogging and promoting products you like and would recommend to others (which is what I do), check out Wealthy Affiliate, my favourite platform for online marketers. Thank you for visiting!

Free starter membership with Wealthy Affiliate

   Let’s keep in touch:

Naturegrooves Logo 19

 in alliance with

Buddhagroove-Logo_website
buddhagroove

6 Non-Invasive Pain Relief Techniques

6 Non-Invasive Pain Relief Techniques

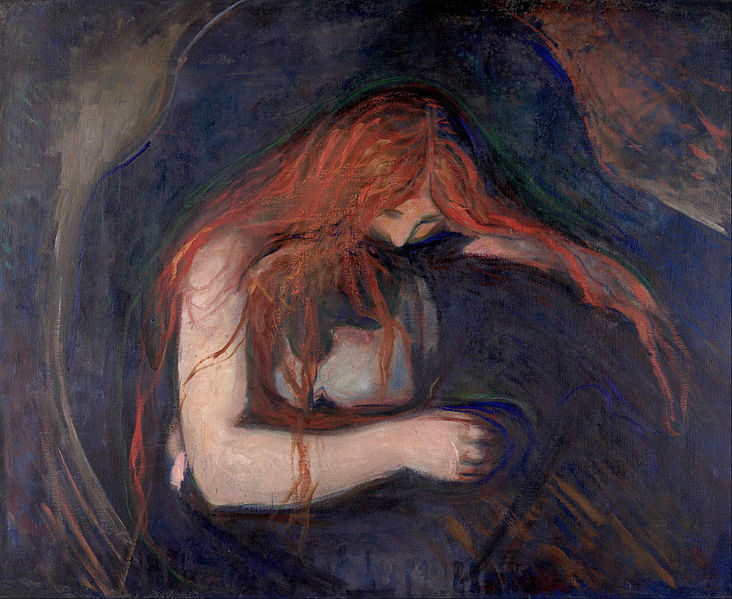
Edward Munch - Vampire

Edward Munch – ‘Vampire’

This article explores six non-invasive pain relief techniques that I have learned from the legendary energy medicine practitioner and teacher Donna Eden. If you are experiencing pain, I encourage you to experiment with these techniques and see what works for you. I hope you will find some of them helpful, and if you do, please share them with others.

The Nature of Pain

Physical pain, in its various forms and degrees, can range from uncomfortable, unpleasant, to incapacitating and debilitating.

However unwelcome and inconvenient pain always is, it is a useful tool for recognising that our body needs our conscious attention to get things back to normal, and possibly avert a much worse health issue.

Pain insists very clearly that we should start taking care of our body. If we don’t get pain, we might not be motivated enough to take care of our body through healthy diet and exercise etc. But when pain strikes, we can be fast enough to try and get ourselves better. To paraphrase Marcel Proust, we make promise to kindness and knowledge, but we obey pain.

Most of us immediately reach for painkillers, or rush to the doctor or a pharmacy to get some, so we can start pain-free again. What was taken for granted before – our normal state without pain, is now regarded as something so desperately desired that we’d give just anything to get it back.

Using Energy to Diminish Pain

Although painkillers can be highly effective in diminishing the pain, in most cases they don’t cause the actual healing – they don’t really treat the underlying issue behind the pain. Through working with energies, we can often achieve results that are much more beneficial to our body then just numbing the pain with chemicals. What’s more, the results of such treatments can be long-lasting.

Pain As Congested Energy

One of the brilliant things about using energy for treating pain is that when we free the stuck / congested energy in the body, the pain often diminishes very quickly and noticeably. And to move the congested energy is often easier than people realise!

Also, stimulating acupuncture points can often increase pain-suppressing endorphins, and release opioid peptides, which are highly effective in relieving pain associated with autoimmune diseases, postoperative discomfort, period cramps, lower back pain, tendonitis, etc.

There are a number of techniques to diminish pain; here are a few examples of the techniques I’ve used with success:

1.Breathing Out The Pain

This is one of the simplest techniques which can be combined with other more complex ones, but it can be helpful even on its own. Since energy can be moved by breathing, we can gain some degree of control over our pain by breathing in through our nose (with mouth closed), an breathing out through our mouth.

Exhaling can release some energy involved with the pain. It’s good to visualise that on the outbreath we are releasing all our physical tension from our head to your toes.

This technique was also popularised by a French obstetrician Fernand Lamaze, who in the 1950s introduced a method called psychoprophylaxis, also known as ‘Lamaze breathing technique’, which helps women in labour to better manage contraction pains, through the use of controlled breathing and conscious relaxation.

The best way to remember this technique is to think of smelling a rose (for the inbreath) and then blowing out a candle (for the outbreath).

2.Tapping

Tapping is another effective technique which is familiar to the body, as it resembles the heartbeat. You’ll be freeing energy in the congested area. This technique is specially good to use for aching muscles – e.g. after carrying heavy luggage.

If, for example, you experience pain in your shoulders, you can use your fingers or a hairbrush to do the tapping. (I particularly like using a wooden hairbrush.) Keep tapping for about a minute, while breathing in through your nose and out though your mouth, visualizing the pain being tapped out of the sore area.

3. Stretching

If you gently stretch the area around the epicentre of the pain, you can often experience some relief. This is due to smoothing, evening out, or freeing the energy that has over-accumulated at the site where you feel the pain. (This technique is obviously not suitable for open wounds or burnt skin)

4. Pinching (‘Spindle Cell Mechanism’)

Using your thumb and your forefinger, VERY lightly pinch the skin around the painful area. This super-light pinch is powerful enough to free clogged energy in the painful area through communicating with your nervous system, informing it that pain is no longer necessary.

5. Siphoning the Pain

As the left side of our body receives energy, and the right sight releases it, this method can provide considerable relief from pain by placing our left hand on the painful area of the person we want to help. Our left hand will be pulling the excess energy from the sore area – ‘siphoning’ it off the other person, and thus providing him/her with relief. The energy will be draining off your right hand. Hold your right hand away from your body, facing down, and out.

Although this doesn’t often happen, it’s good to be aware of the risk of the energy of the other person being caught in your own body while performing this technique; you may start feeling pain yourself. This happened to me recently when I was treating my husband.

If this happens, stop at once and shake your hands off energetically. (I did exactly that, and then, to free my right hand from pain completely, did another healing technique on myself, described below. My pain was gone in less than ten minutes.)

6. Zone Tapping

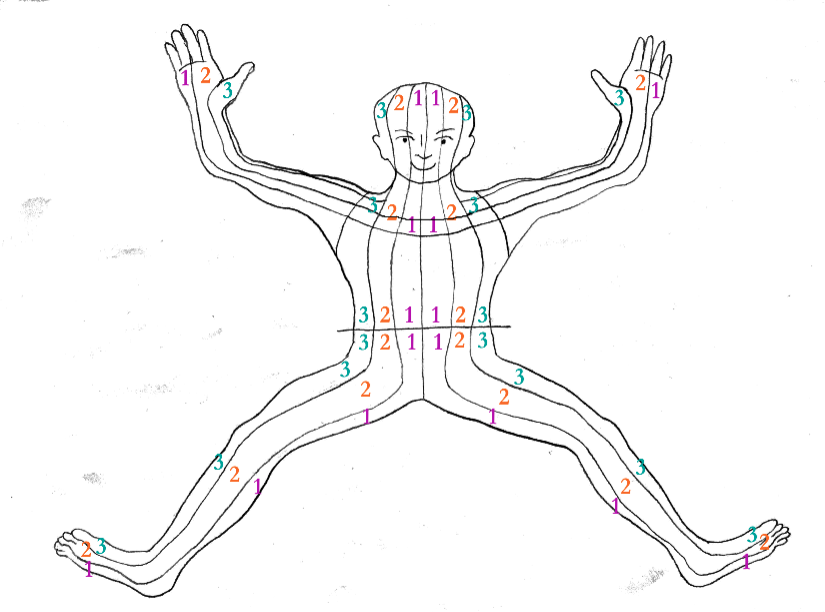
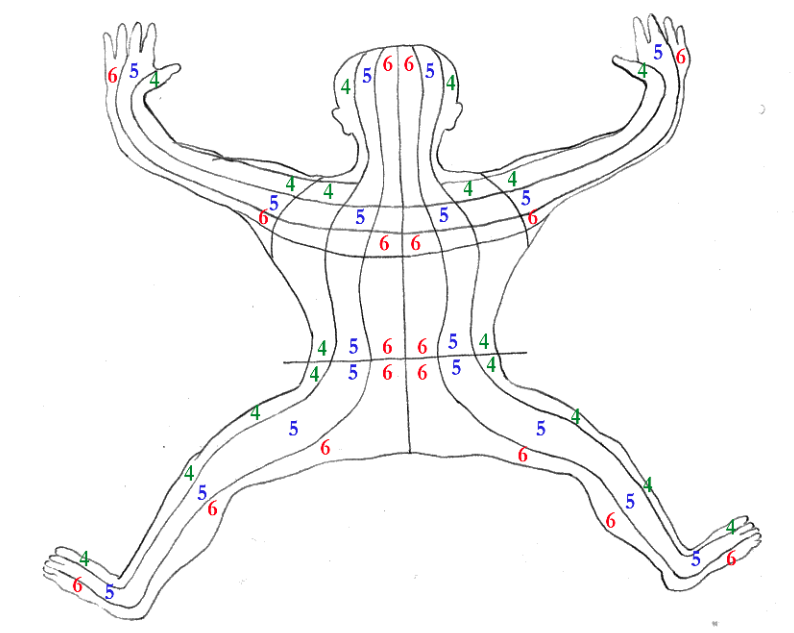
One of the ways to stop or diminish pain is a technique called Zone Tapping. This technique is also practised in foot reflexology. I have used this technique on quite a few people including myself, and I’m happy to say that in most cases this simple treatment resulted in noticeable pain relief. According to this discipline, the body is divided into 6 zones (Figure 1 and 2).

First, you first locate the source of the pain on your body, then look it up on the diagram and determine on which zone the point of your pain lies. (This technique is more suitable for localised pain, rather than diffuse, widely spread pain)

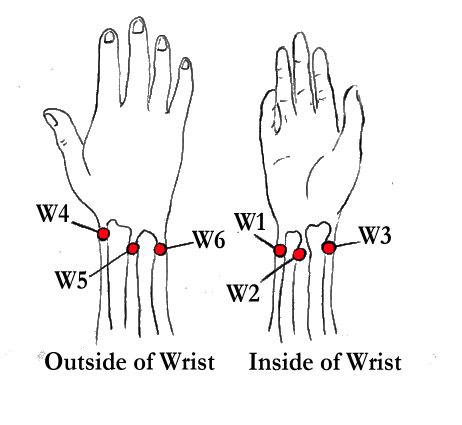
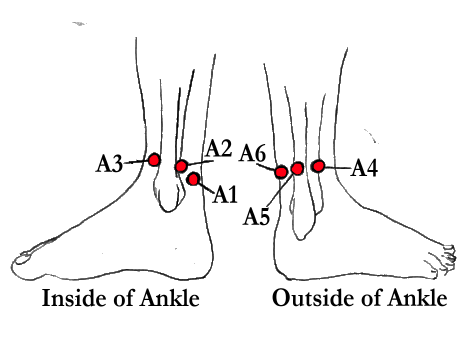
You’ll then tap specific points on your wrists or your ankles, depending on which zone your pain is, and also whether it is on the front or the back of your body.

The softer parts of the body, which are in front your body and inside the limbs, (where hair doesn’t grow as easily) are classified as YIN.

This also includes the bottoms of your feet and the palms of your hand. It is easy to remember the yin parts especially when we think of the hairless areas of the arms and legs.

The slightly tougher areas of your body, especially the back, are considered YANG. This also includes the backs of your hands, the tops of your feet, the outsides of your limbs (where hair can grow) and the back of your head and neck.

To practise the zone tapping, follow these steps:

1. Locate your pain on your body and then look it up on the map of the body (Figures 1 and 2)

Figure  1 

Figure  2 

2. Find the number of the zone which flows through the area of your pain.

3. If your pain is anywhere above your waist, you will be tapping one of the allocated points on your wrist;

If the pain is anywhere below your waist, you will be tapping one of the corresponding points on your ankle.

(Note: ‘A’ in the diagram means Ankle, and ‘W’ means Wrist.

If your pain lies on the front (YIN) part of your body, you’ll be tapping on the INSIDE of your ankle or your wrist. (Remember: Yin = Inside)

If the pain lies on the back (YANG) of your body, you’ll be tapping the OUTSIDE of your ankle or your wrist. (Remember: Yan = Outside) 

4.  Find the point on the wrist (for pain above the waist) or ankle (for pain below the waist) that corresponds with the point of your pain. (Figures 3 and 4)

Figure  3 

Figure  4 

For example, if your pain is on the front of your head, near the centre, it will be in zone 1.

As it is above the waist, we’ll be tapping on the wrist.

And as it is located on the front (YIN) of the body, we’ll be tapping inside the wrist.

Then we’ll find W1 (Wrist 1) point on the diagram.


The Tapping Procedure:

1. Tap the point about ten times, and then stop for ten seconds.

2. Tap for 1,5 minutes (90 seconds) more. I usually tap in a one second interval and count to ninety.

3. In about ten minutes the pain should ease or disappear. If it doesn’t, do the same procedure on the opposite side of the body.


Note: If you are unsure whether you were tapping the correct point, you can energy test each of the points first. Press each of the points, and at the same time push the treated person’s arm (which is extended in 90 degrees from the body) down.

The person will lose energy on the zone that needs to be tapped and will remain strong on the other ones.

Back and Shoulder Pain

If you are suffering from back or shoulder pain, I recommend you visit my article ‘How to Relieve Chronic Back Pain.’

I hope you’ve found this article helpful. If you have any questions or comments, leave a comment below. I wish you a pain-free day!

BY LUCIE DUN

This site has been (very happily) built with DIVI, by Elegant Themes.

Disclaimer: This page contains affiliate links. This means that if you decide to make a purchase through my links, I will earn a small commission at no extra cost to you. The complete Affiliate Disclosure can be accessed here. If you’d like to learn more about affiliate marketing, check out my favourite platform for online marketers. Thank you for visiting!

   Let’s keep in touch:
Naturegrooves Logo 19

 in alliance with

Buddhagroove-Logo_website
buddhagroove
TIPS ON STRENGHTENING YOUR IMMUNE SYSTEM

TIPS ON STRENGHTENING YOUR IMMUNE SYSTEM

We’ve all learned in the past few years how important is to keep our immune system strong. Over the past few years, I have been exploring various ways of strengthening the body’s resilience, especially those that could be easily implemented into my daily routine.

I’m happy to say that I found several tools and practices that caused a remarkable improvement in my health. I used to get colds at least every three months, but since I’ve started implementing these techniques, my immunity has become much stronger. There was a period when I hadn’t had a single cold for more than four years in a row!

In this post, I will mention my three favourite tools for a strong immune system.

1) ENERGY MEDICINE TECHNIQUES

Do the Daily Energy Routine (or parts of it) daily – it only takes a few minutes.

The Daily Energy Routine is a set of simple but powerful exercises by the legendary healer Donna Eden, the founder of Eden Energy Medicine. She was born with the ability to see energies and as she learned to work with her energy systems, she managed to heal herself from a number of serious conditions including Multiple Sclerosis. She has taught thousands of people how to empower themselves by using their own energy to heal themselves and stay healthy.

I met Donna Eden and her husband, clinical psychologist David Feinstein in 2019. I highly admire their work. In 2023 I completed the Eden Energy Medicine Certification program and I’d love everyone to learn about these incredible self-healing tools. The Daily Energy Routine is one of them.

Each of the exercises in the Daily Energy Routine is designed to balance and strengthen specific energetic systems in your body, leading to greater resilience, the ability to fight illness, and feeling better in general.

Follow the steps in Donna Eden’s video and see how you feel after going through the exercises!

Below is an outline of the main points from this video. It is best to watch the video first and use these points as a reference afterwards.

THE DAILY ENERGY ROUTINE:

1. THE FOUR THUMPS:

i) Cheekbones – grounding

ii) Collarbone – vitality

iii) Thymus – immune system

iv) Ribcage under breasts – metabolizing

2. THE CROSSOVER SHOULDER PULL – gives you energy, clarity of mind, supports healing

3. THE CROSS CRAWL – harmonizes energy patterns, helps the brain to function better

4. THE WAYNE COOK POSTURE – helps to stabilise emotions and improves focus

5. THE CROWN PULL – supports the flow of the cerebrospinal fluid, brings fresh energy into your head, good against headaches

6. CONNECTING HEAVEN AND EARTH – sends healing energies through your body, sends out built-up toxins

7. THE ZIP UP – strengthens your energetic field, protects against negative energies

8. THE HOOK UP – connects the central and governing meridians (at the front and back of your body) which creates a strong force, sending spiraling energy around the body and positively affecting all your energy systems. This simple exercise can sometimes stop a seizure. (Energy Medicine by Donna Eden, pg 99)

Note: During each exercise breathe in through your nose and out through your mouth

MORE IMMUNITY BOOSTING TECHNIQUES

I also recommend trying some of the exercises that were shown by Donna Eden and David Feinstein during the Covid-19 pandemic. In the video, Donna and David present several powerful immunity-boosting tools that can be done anywhere. I remember following the exercises and feeling much better instantly. I use these techniques frequently, and tech them to my clients.

DONNA’S IMMUNITY BOOSTERS – PART 1

1. THUMP YOUR THYMUS – to boost your immunity

2. MASSAGE THE POINTS UNDER YOUR KNEES (the ‘Stomach 36’ acupressure points) to stimulate nurturing energy and strengthen your immunity

3. MASSAGE YOUR NEUROLYMPHATIC REFLEX POINTS to help the lymph flow and remove toxins. These points can be found at multiple locations:

at the seams of your arms (to move toxins out of the body)

all around your chest (to move congestion out of your lungs)

on the sternum (to help overcome illnesses and give you vitality)

under your breast (for the stomach and liver reflex points)

under the ribcage (massaging your spleen reflex points is particularly beneficial for your immune system)

under the ribcage (all along) – the small intestine reflex points are also very important for your immunity

an inch above the belly button, and an inch to each side (adrenal reflex points, great against stress and too much adrenalin)

the sides of your thigh (outside: Large intestine reflex points / Inside: Small intestine reflex points)

go down the side of your spine and massage all the neurolymphatic points (‘The Spinal Flush’). This is extremely cleansing and rejuvenating.

4. THE HOOK UP – connects front and back meridians which strengthens your aura and protects you against negative energies.

5. HOLD SPLEEN MERIDIAN ACUPRESSURE POINTS (follow Donna’s instructions in the video)

First pair: 2-3 minutes (do this twice – first  on one side of your body, then on the other)

Second pair: 1 – 2 minutes (again, hold the points on both sides of the body – with this pair, it’s is easy to hold both sides in one go)

Holding these points strengthens your immune system and can also generate more inner joy.

6. HOLD / MASSAGE THE ‘LOWER DANTIAN’ CALMING POINTS:

Drop two inches below your belly button and press all your fingers into the area. There is an energy center called the Lower Dantian, and holding it calms fear and panic.

Here is a follow-up on the immunity-boosting video above, with additional tips and exercises.

DONNA’S IMMUNITY BOOSTERS – PART 2

1. MASSAGE THE TRIPLE WARMER POINT (see instructions at 0:45) to mobilise the protective force of this meridian in the optimal way

2. MASSAGE NEUROLYMPATICREFLEX  POINTS (Kidney 27 – under your collarbone corners – see 1:52) – to help kidneys function well, help all the other meridians flow in the right direction

3. ‘RAKE’ YOUR NEUROLYMPHATIC REFLEX POINTS around the lung area to help them work well

4. DO STRETCHING EXERCISES e.g. the Ileocecal and Houston valves (3:10) – to help valves in your body open and keep poisons moving out of your body

5. BREATHE DEEP (especially on the out-breah)

6. STRETCH YOUR MOUTH WITH STAINLESS STEEL SPOON – to activate important meridians (4:19)

7. KEEP TAKING VITAMIN C to keep your immune system strong.

2) MEDITATION

Try meditation. I can’t recommend it enough. I was introduced to meditation (perhaps rather surprisingly) by ‘The God of Hell Fire’ Arthur Brown (a 60’s icon singer I used to play keyboards with).

If you’ve ever seen him on stage and wondered where he gets all that crazy energy, I can tell you – after my own experience – that this might well have something to do with it. Meditation is proven to give you more energy, strengthen your immunity, decrease your stress levels, improve your sleep, making you more creative, and much more.

See my article about the numerous benefits of meditation, where I share my own experience with regular meditation practice. If you are a busy person, it is exactly the right thing for you, because it will actually create more time in your day. You’ll find out for yourself as soon as you start practicing it regularly. Together with Donna Eden’s Daily Energy Routine, it’s one of the best things you could be doing for your immune system.

3) HYDROGEN WATER

Drink good quality (filtered or bottled) water infused with hydrogen. This smallest and lightest molecule in the whole cosmos has enormous potential and can power up your cells and provide numerous benefits to the body, from anti-inflammatory and antioxidant effects, to anti-allergic and anti-aging.

Molecular hydrogen influences metabolic pathways and upregulates the body’s own antioxidants, selectively targeting harmful radicals, thus protecting cells from damage and reducing oxidative stress, which is linked to aging and various diseases. It plays a key role in supporting the immune system.

For me, this has been one of the greatest discoveries ever. I drink hydrogen water daily and feel uplifted, energised and balanced.

Another positive consequence of drinking molecular hydrogen is that I stopped craving late-night snacks, which used to be my long-term bad habit.

You can find all the relevant information about molecular hydrogen on my Home page.

Molecular hydrogen

BY LUCIE DUN

This site has been built with DIVI, by Elegant Themes.

Naturegrooves Logo 19

 in alliance with

the shift network logo

Transformational education to awaken your full potential

The Shift Network

&

Certification of The CellPoer bottle

Disclaimer: Some pages on this website contain affiliate links. This means that if you decide to make a purchase through my links, I will earn a small commission at no extra cost to you. If you’d like to learn more about affiliate marketing, e.g. how to earn extra income from blogging and promoting products you like and would recommend to others, which is what I do, check out Wealthy Affiliate, my favourite platform for online marketers. You can create a free account, which will enable you to make your own website in a few simple steps, and host it with them – free of charge – for as long as you like. You can test it right now by trying their free website builder SiteRubix. Thank you for visiting!

Free starter membership with Wealthy Affiliate

How to Relieve Stress and Anxiety

How to Relieve Stress and Anxiety

Zen-Inspired Stone Moon Tealight Holders

If you’d like to learn how to relieve stress and anxiety through a few simple but effective techniques, then you are in the right place. The renowned practitioner of energetic healing, Donna Eden,  shows several  techniques that can calm your emotions in less than a minute. Plus, if you practice these techniqes often, you will contribute to building your long-term emotional resilience.

The Constant Flow of Energy and Emotions

The saying ‘Nothing ever stays the same’ applies to everything, and our emotions are no exception. Since our energy is in a constant flow, emotions are bound to fluctuate as well. Everyone deals with this differently – some people have more natural resilience, while others may become extremely vulnerable. To be able to master emotional control is one of the most valuable skills to have, and the good news is that we can use our own energies to gain more control over our states.

water_in_movement

Stress and its Effects

One of the most common causes of feeling bad is stress. It has an ability to impact every single system in your body, and its effects can either be immediate and visible, or gradual and not too obvious in the first stages. It often accumulates over time, and then finally hits us in a form of a physical illness or depression.

Many of us go through our day in the state of emergency response without even realizing it, but the stress keeps building up in our body whether we’re aware of it or now, and it will take its toll on our health eventually.

What Happens in Our Bodies During Stress

When our thoughts about everyday problems take over us, we don’t see what is happening in our body: Up to 80% of the blood leaves our forebrain to provide strength to our muscles to deal with the potential danger, and our bloodstream gets filled with stress chemicals. In that state, our biochemistry is not very different from the one of a Cro-Magnon man facing a wild beast. The advanced cognitive abilities that we have developed become dimmed. As the reactive primitive parts of the brain take over, our ability to respond accordingly to our current evolutional stage is considerably inhibited.

art therapy colours

Inner Emergency Triggers

One of the clearest illustrations of this concept is post-traumatic stress disorder; People afflicted with this condition can display extreme, exaggerated reactions to seemingly harmless stimuli. For instance, overhearing someone saying something, seeing something on TV or encountering a certain scent can trigger a traumatic memory. This makes their body think they are facing a mortal threat, and they react accordingly.

But similar, if a less dramatic scenario applies to most of us when we get stressed, anxious or angry. Our body sets in motion all the biochemical emergency procedures which are not really required. However, our body doesn’t distinguish between the real-life threat and something far less endangering, and all these stress processes can have a negative impact on your health.

Rewiring Your Nervous System

The good news is that we can gradually reprogram our autonomic nervous system, so it no longer triggers those extreme stress responses, deeply ingrained in us biologically millions of years ago. By teaching our nervous systems these new tricks, we can keep and even strengthen our health.

This reprogramming can be achieved by teaching our nervous system to keep the blood in the forebrain, which will result in a better ability to think clearly even in the midst of a seeming crisis. And when our brain gets used to these new ways of processing usually stressful impulses, we’ll no longer react impetuously, but we’ll rather respond to the situation by a much more down-to-earth way.

The First Aid Kit for Your Nerves: Holding the Neurovascular Points

All this can be achieved by an incredibly simple energy exercise – holding the neurovascular points on your head while thinking of a stressful situation / disturbing memory, which will cause primitive brain centres to respond in a calm way, rather than as in an emergency. The more you do this exercise, the more you’ll notice that manage that the stress-response cycle is not activated when a certain situation or a memory occurs.

This works because your stress reactions are based more on physical responses rather than psychological. When we hold the neurovascular points, blood flows from the reactive brain up into the prefrontal cortex, where we can solve the issue with more clarity and decrease the emotional reactivity. So rather than blindly react, we’ll be able to respond to an otherwise stressful issue with healthy detachment.

Try in Now

Put your one hand over your forehead and the other one over the back of your head. Take several deep breaths, close your eyes and feel the calm pulse in your hand or on your forehead.

Neurovascular Points

You can also try a variation of this exercise by placing the pads of your fingers on your forehead, covering the two slight indents on your forehead, while your thumbs rest on your temples.

Stay like this for a while, ideally for a few minutes – according to the level of your stress. Doing this will help the blood return your forebrain, and you will realise that you are thinking more clearly and that the painful or disturbing emotion has subsided.

Gaining Long-term Emotional Stability

The more frequently you repeat this exercise, the quicker will your brain understand that it is not necessary to activate the stress-response cycle when that specific thought/memory occurs.

It is comparable to resetting a device to its original factory settings. Your mind will become free of disturbing information written by your life experience. I’d recommend trying this exercise with a number of different stressful memories, thoughts or pressing issues. The brain’s unwanted response to any of these categories will gradually ease out. You’ll soon notice you have acquired much more emotional stability when you experience a stress-triggering situation or a disturbing thought.

Three Techniques with Donna Eden

The renowned teacher of energy medicine,  Donna Eden, and her husband, clinical psychologist David Feinstein, show how we can work with our own energies to release stress and anxiety. Holding the Neurovascular Points is one of those techniques (Donna talks about it from 1:23 onwards.)

David and Donna are also the authors of the book ‘The Healing Power of EFT & Energy Psychology’, where they present a large number of techniques for emotional healing. In his clinical practice, David Feinstein uses Donna Eden’s energy medicine techniques as well as EFT, which stands for ‘Emotional Freedom Techniques’, and consists of tapping on specific meridian points. This technique has been used with tremedous success for all kinds for phobias and traumas. War veterans, for instance, have been succesfully treated using EFT tapping.

The ‘Kettle-Trick’: Energy-Test Yourself

It is very interesting to try the following experiment, based on the method used in energy psychology and kinesiology:

Fill a jug or a tea kettle with water, and try to lift it with your arm straight in front of you. You should be able to raise the kettle in front of your eyes. It should be moderately heavy, to make your muscles work. If it’s too heavy (if you can’t lift it in front of your eyes), pour some water out until it reaches an optimal weight.

a kettle for energy-testing experiment

Now think about something that makes you feel nice. It could be pleasant memory, or something you’re proud of or grateful for.

Lift the kettle in front of your eyes again. It should be relatively easy.

Now think of something that bother you, stresses you or makes you anxious. Try to lift the kettle again. You’ll notice that your arm gets considerably weaker after the negative thought. This shows the instant effect stress can have on your energy flows. Your energy is not feeding your muscles at its full power while you are stressed (or, as in this case, tricking your brain by pretending to be stressed).

You can use this experiment is more useful way than a fun parlour trick. If you know of anything in your life that stresses you or triggers negative or anxious thoughts, do this experiment to confirm it.

Then follow Donna Eden’s techniques, especially the Neurovascular hold by placing your palm on your forehead for one to three minutes while thinking of the pressing issue.

Don’t worry about ‘negative thinking’; this is a method that uses the truth that you feel inside, rather than fooling yourself with positive affirmations. And while acknowledging the uncomfortable or painful truth, you are sending a physical message to your brain, which reads something like ‘Even though I’m thinking about all this bad stuff, there’s no need to go into a fight or flight mode.’

When you have finished, try to lift the kettle again while thinking about the same unpleasant issue.

You’ll hopefully get a nice surprise by being able to stay strong – which indicates that despite a usually stress-triggering image in your mind, your energy remains balanced and you are now responding to stress much more calmly, rather than reacting through the instinctive emergency response. The more you do these exercises, the more your naturally adaptable brain will ‘cooperate’.

Energy-testing with a Friend

Instead of using a kettle, you can get a friend to energy-test you by pushing your arm down (raised sideways, up to the level of your shoulder) while you offer resistance.

Rewiring Your Brain

The amazing characteristic of our brain, neuroplasticity, can cause radical rewiring of your brain’s old reactive patterns, allowing us to start experiencing more peaceful and joyful states of mind, and become much more emotionally resilient.

mechanical_brain

Gaining Long-term Emotional Stability

The more frequently you repeat the exercises presented in this article, the quicker will your brain understand that it is not necessary to activate the stress-response cycle when that specific thought/memory occurs.

It is comparable to resetting a device to its original factory settings. Your mind will become free of disturbing information written by your life experience. I’d recommend trying this exercise with a number of different stressful memories, thoughts or pressing issues. The brain’s unwanted response to any of these categories will gradually ease out. You’ll soon notice you have acquired much more emotional stability when you experience a stress-triggering situation or a disturbing thought.

Share Your Thoughts

If you would like to ask about anything in this article, or would like to express your opinion about this field, leave a comment below. I’d also be very interested to learn about your any other techniques for relieving stress, so feel free to share your knowledge or experience.

BY LUCIE DUN

This site has been built with DIVI, by Elegant Themes.

RECOMMENDED SECTIONS:

Online courses and webinars
Health and Wellbeing Products
Inspirational Books and Audio

Disclaimer: This page contains affiliate links. This means that if you decide to make a purchase through my links, I will earn a small commission at no extra cost to you. (The full Affiliate Disclosure can be read here.) If you’d like to learn more about affiliate marketing, e.g. how to earn extra income from blogging and promoting products you like and would recommend to others, which is what I do, check out Wealthy Affiliate, my favourite platform for online marketers. You can create a free account, which will enable you to make your own website in a few simple steps, and host it with them – free of charge – for as long as you like. You can test it right now by trying their free website builder SiteRubix. Thank you for visiting!

Free starter membership with Wealthy Affiliate

   Let’s keep in touch:

Naturegrooves Logo 19

 in alliance with

Buddhagroove-Logo_website
buddhagroove

How to Stop a Cold in its Tracks

How to Stop a Cold in its Tracks

Cold free!

Have you ever wondered how to stop a cold from developing? I’m still pinching myself about this, but I managed to go through last two winters without getting a cold. In my case, this is a bit of a miracle. I used to catch colds even in the middle of summer, but autumn and winter especially had always been the dreaded seasons for me.

Almost every time I’d take part in a social gathering, have a night out, go to work not rested enough, or, rested enough but meeting someone with a cold, I’d end up with a sore throat, weak muscles, headache, cough, all these symptoms accompanied with overall lethargy and tiredness.

My mood would just plummet at the first tingle in my throat, since I knew I’d be sentenced to at least a week of misery. And since I can never stay in bed a whole week, I’d have to go about my daily business ill. Commuting to work would turn into a nightmare, especially the joys of the rush hour, when standing with week legs in a hot, packed train, squeezed by the mass of anonymous bodies, longing for an empty seat on which I could just collapse and preferably evaporate.


The turning point

When I discovered the legendary healer Donna Eden, the founder of Eden Energy Medicine, (more in my article Incorporating Energy Medicine Into Everyday Life)  the first thing I learnt was the Daily Energy Routine, which is a set of exercises which you can perform in less than 10 minutes but which have a dramatic impact on your health. And very soon I realised that this was one of the best, most useful things I’ve ever learnt in my life.

Because when you start practicing this short, simple routine daily, you’ll soon notice considerable improvement in the way you feel and operate. You’ll start ‘collaborating’ with your own body in terms of correcting its energy flows, which will have an noticeable impact on your overall health and state of mind.

What really caught my attention when reading about this set of exercises, was Donna’s story about reversing a coming flu. She was about to give a major talk in London in front of a large audience, when she started feeling unwell. At that time there was a flu virus getting around and she felt she caught it, feeling increasingly weak and nauseous.

So she decided to resort to her tried an tested ‘first aid’ – i.e. thumping her spleen neurolymphatic reflex points, which lie on the ribcage beneath the breasts.

So there she was, standing in front of an audience, not saying a word, just banging her ribcage. The audience must have considered it rather odd!

When, after a while, Donna started feeling well again, she explained to the puzzled audience what she was doing: She was tapping at her spleen neurolymphatic reflex points, which helped her lift her energy levels and boost her immune system instantly, and this deceptively simple exercise helped her prevent a potentially nasty cold.

You can nip a cold in a bud, too!

If you start practicing the Daily Energy Routine (explained further down) on a daily basis, your body will become much more resistant to viruses. I really cannot praise it enough, and I can’t stop talking about the verging-on-miraculous technique which so clearly rescued me from a beginning cold, on multiple occasions.

One instance of this was in October, when after a string of very hectic days I woke up in the middle of the night with the dreaded dryness in my throat, accompanied by a feeling of increased temperature in my body, clogged sinus, and a headache. There we go, a week of hell has started! I thought.

However, I decided to take some action in a form of giving this newly discovered energy medicine a try.


Better in about three minutes!

After the essential sinus clearing, (described further down) which relieved the worst of my ill sensations, I went on to do the ’emergency four thumps’.

As you will see in her video, Donna’s Daily Energy Routine starts with ‘The Four Thumps’, which can do wonders for your body when you feel drained and about to succumb to a cold.

And that’s exactly what I did then, in the middle of the night. It took me only about 3 minutes, but I felt so much better afterwards! Clearheaded, less achy, feeling this healing flow of energy throughout my whole body. Then I returned back to bed, fell asleep, and lo and behold – when I woke up, I was fine!

This is the reason I keep talking about this technique everywhere and with such enthusiasm. I credit The Four Thumps and the rest of the Daily Energy Routine with banishing my cold several times already since last autumn!


The Four Thumps in detail

By thumping those four points, you will activate a sequence of responses that will impact your energy field by sending electrochemical impulses to your brain and releasing neurotransmitters, which will make you feel as if you are ‘recharging your batteries’.

You will be releasing toxins from clogged areas and allowing all the subtle energies, which support the vital organs in your body, to flow freely, and thus supporting your natural ability to heal.


The Four Thumps consist of the following:

  • The Stomach meridian thump
  • Kidney meridian (K 27) thump
  • The Thymus Thump
  • Spleen neurolymphatic reflex points thump

Important: For all the following exercises, breathe deeply, in through your nose and out through your mouth.

(You can remember it this way: First ‘smell a rose’, then ‘blow out a candle’.)

This form of breathing, practiced widely in yoga, connects the central meridian with the governing meridian, (which impact all the other 12 meridians) and moves vital energy through the chakras.

I personally devote about three to four deep breaths to each exercise.

On average, about 15 – 20 seconds is sufficient for each exercise.

Don’t forget to thump firmly and vigorously!


The Stomach meridian thump


Using the pads your fingers, tap on the edge of the cheekbones under your eyes. There are important acupressure points, and tapping them will help you ground yourself and receive healing energy from the earth. You will notice that you are feeling less stressed or tense, and more ‘in your body’, or more present. It’s a great little exercise to do just before meeting someone, as it promotes clear thinking, as you’ll also be grounded, you’ll feel more confident.

(I tell myself: ‘Before you knock on someone’s door, knock on your cheekbones’!)

With regards to preventing a cold, this technique helps to drain sinuses and clear the lymph glands in your neck, so it’s indeed a first-aider worth remembering.


Kidney meridian (K 27) thump

This exercise is the queen of energizers, as it literally jump-starts all your meridians. It lies at the junction of all the other meridians, so it is very powerful. If you are exhausted, physically or emotionally, your meridian energies are flowing backwards.

Stimulating the kidney meridian points can reverse the energies, so they start flowing forwards. Often you’ll notice a sudden change in your energy right after performing this exercise.

It will also focus your mind.

To locate these points (K 27 = 27th point on the kidney meridian), first place your fingers on your collarbone, and then move them towards the U-shaped notch (where your neck starts).

Move your fingers to the bottom of the U-shaped notch, and then about an inch to the left and right – those two soft points right under the bone are the K 27s.

You can thump those points, but you can also massage them instead. This should be done vigorously and with firm pressure.


The Thymus thump

This is excellent for your immune system, as it turns it on. Have you ever seen a gorilla banging her chest? This exercise might well make you want to climb a few trees.

Place your fingers on the centre of your sternum, at your thymus gland, and thump firmly for about 15 – 20 seconds.

This exercise is especially great when you need to persist with something and you are aware you are starting to lose energy. You’ll see that suddenly you’ll be able to go on for much longer.

(Donna used to teach this to swimmers, for example)


The Spleen meridian neurolymphatic points

The spleen neurolymphatic reflex points are part of the lymph system. Since the spleen is crucial to the functioning of the immune system, stimulating these points by tapping / thumping is a great way to:

  • Lift your energy level
  • Synchronize your body’s rhythms
  • Boost your immune system
  • Remove toxins
  • Fight infection
  • Help to cope with stress
  • Lessen dizziness
  • Help with metabolizing food, toxins, and stress
  • Balance your blood chemistry (incl. blood sugar)

Tap (with three-finger notch) the spleen meridian neurolymphatic points beneath the breasts on the ribcage. These points also govern your pancreas, so it’s good for blood sugar regulation.

This will help you metabolise anything that is not good for you, which can range from food and toxins to your or someone else’s negative thoughts.

You can also tap the spleen acupuncture points, located on the side of the body about four inches down from the arm pits.


Donna in action

The Four Thumps are a part of The Daily Energy Routine, which includes several more exercises. In this article I have focused on The Four Thumps only, as a tried-and-tested first aider when you start feeling ill, but I strongly recommend learning the whole Energy Routine and incorporating it into your daily life. It takes only a few minutes, but it can have a long lasting positive effect on your health.

If you’re consistent with it, your immunity will strengthen, so you might not even need to experience those ‘first aider’ moments when you find yourself on a bug battlefield. You will become much more resilient to virus attacks and those seasonal colds will become history.

So go on and check out the whole Daily Energy Routine, which Donna demonstrates so charmingly in this video; it might become your own ‘energy vaccine’!

Here’s how Donna does it:

Donna Eden demonstrates The Daily Energy Routine

IMPORTANT UPDATE (March 2020) – please watch Donna and David’s advice regarding the Coronavirus pandemic in the video below. It includes some very helpful immunity-boosting tips you can do ‘on the go’, so check it out and ideally share it with others! Thank you.

In addition to these techniques, here some more cold-easing tricks which have always worked for me:

Black Pepper Tea

This is a super-easy Ayurvedic recipe I’ve learned from my meditation teacher Emily Fletcher (check my article on how meditation can improve your life), and I have noted very good results – both in my own case and with people I’ve recommended this to. So when you’re feeling that a cold is coming, make this healing drink:

– Grind a pinch or two of organic black pepper into a mug

– Slowly pour boiling water into it and let the pepper settle to the bottom of the mug.

– Sip the ‘pepper tea’, which will help you sweat out the cold and eliminate the bugs in your throat.

– Do this every two to three hours .

– If you want to make the drink more interensting, add some more spice, such as cardamom, cinnamon and turmeric. Turmeric is especially great because of its anti-imlammatory properties. A teaspoon of it will add a nice golden colour to your peppery drink.

– While sipping this healing drink, visualise yourself getting better, and thank your body in your mind for healing you. Try to feel the emotion of gratitude, imagining how liberated you will feel once you are healthy again, while fully accepting that this is a time of healing rest for your body.

A ‘sinus rinse’ – a great addition to the four thumps

When you feel the cold is beginning to get you, especially through the annoying signs of a blocked or runny nose, a sore throat, a headache and a feeling of general malaise, a highly effective addition to the Four Thumps and a hot drink is a so-called ‘sinus rinse’.

It’s a sinus-relieving and cleansing technique I learnt in India, and however unusual or even uncomfortable it may initially appear, I swear by it!

I much prefer experimenting with these ‘earthly’ methods, if they make me feel clearly better; I find this natural method so much better than using chemical decongestant nasal drops or all those anti-cough sweets.

(Well, perhaps with the exception of the Ricola Herbal Sweets – I personally think the Mountain Mint and the Glacier Peppermint Mint are the Manna from Swiss heaven in a pastille form. 😉

So, if you’re not afraid of getting some salty water into your sinus, you’ll be rewarded by an instant, considerable relief from both sore throat and a headache.


How to do a sinus rinse:

Fill a glass with a bit of warm water, sprinkle a small amount of finely ground sea salt in it, then block one of your nostrils with your finger, and ‘drink’ the water with your other nostril.

Then you blow it out, and/or and spit it out with your mouth. Do both nostrils, and then gurgle (Or vice versa, that’s up to you)

Make sure the salt goes into both your nostrils and your throat.

This really is a brilliant way of getting rid of a headache caused by blocked sinus – do try it out and you’ll see what I mean.


Learn more about Energy Medicine

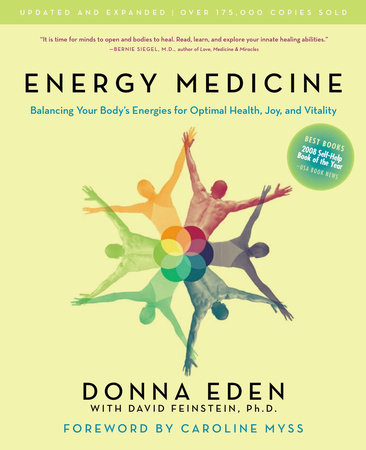
Would you like to learn more about Energy Medicine? For example, the science behind Daily Energy Routine is fully explained on pg. 72 – 99 in Donna Eden’s book ‘Energy Medicine – Balancing Your Body’s Energies for Optimal Health, Joy, and Vitality’, which has become a classic in the field of Energy Medicine, and contains everything you want to know about the essentials of this groundbreaking discipline.

You can get a copy of ‘Energy Medicine’ on my Resources page, full of other great books and items related to Energy Medicine and general health and wellbeing.

I hope you’ve found this article useful. If you’ll ever feel that familiar tingle in your throat, or start to feel under the weather in general, do try some of these tips listed here and let me know how it went! I’d be happy to hear from you.

BY LUCIE DUN

This site has been (very happily) built with DIVI, by Elegant Themes.

Disclaimer: This page contains affiliate links. This means that if you decide to make a purchase through my links, I will earn a small commission at no extra cost to you. I only recommend products that I have personally used or conducted thorough research on, authors who inspire me, and courses/programs I’ve either attended or would consider joining. If you’d like to learn more about affiliate marketing, check out Wealthy Affiliate, my favourite platform for online marketers. Thank you for visiting!

   Let’s keep in touch:

Naturegrooves Logo 19

 in alliance with

Buddhagroove-Logo_website
buddhagroove

Pin It on Pinterest